Info: Machine translation This post was machine-translated from the Chinese original. Wording may be rough in places — the Chinese version is authoritative.
Summary 31 GiB weight, 20 steps in 69 seconds on M5 Pro; Chinese calligraphy correctly writes four characters. Encountered three dependencies and process traps when connecting to LocalBrain. HyphenTech · 2026-09-22
After lowering the 31 GiB weight, I clicked “Generate” in my own LocalBrain and got an error. I changed one place, clicked again, and still got an error. The third time the image appeared—and two out of three errors didn’t even provide a single insight I could understand.
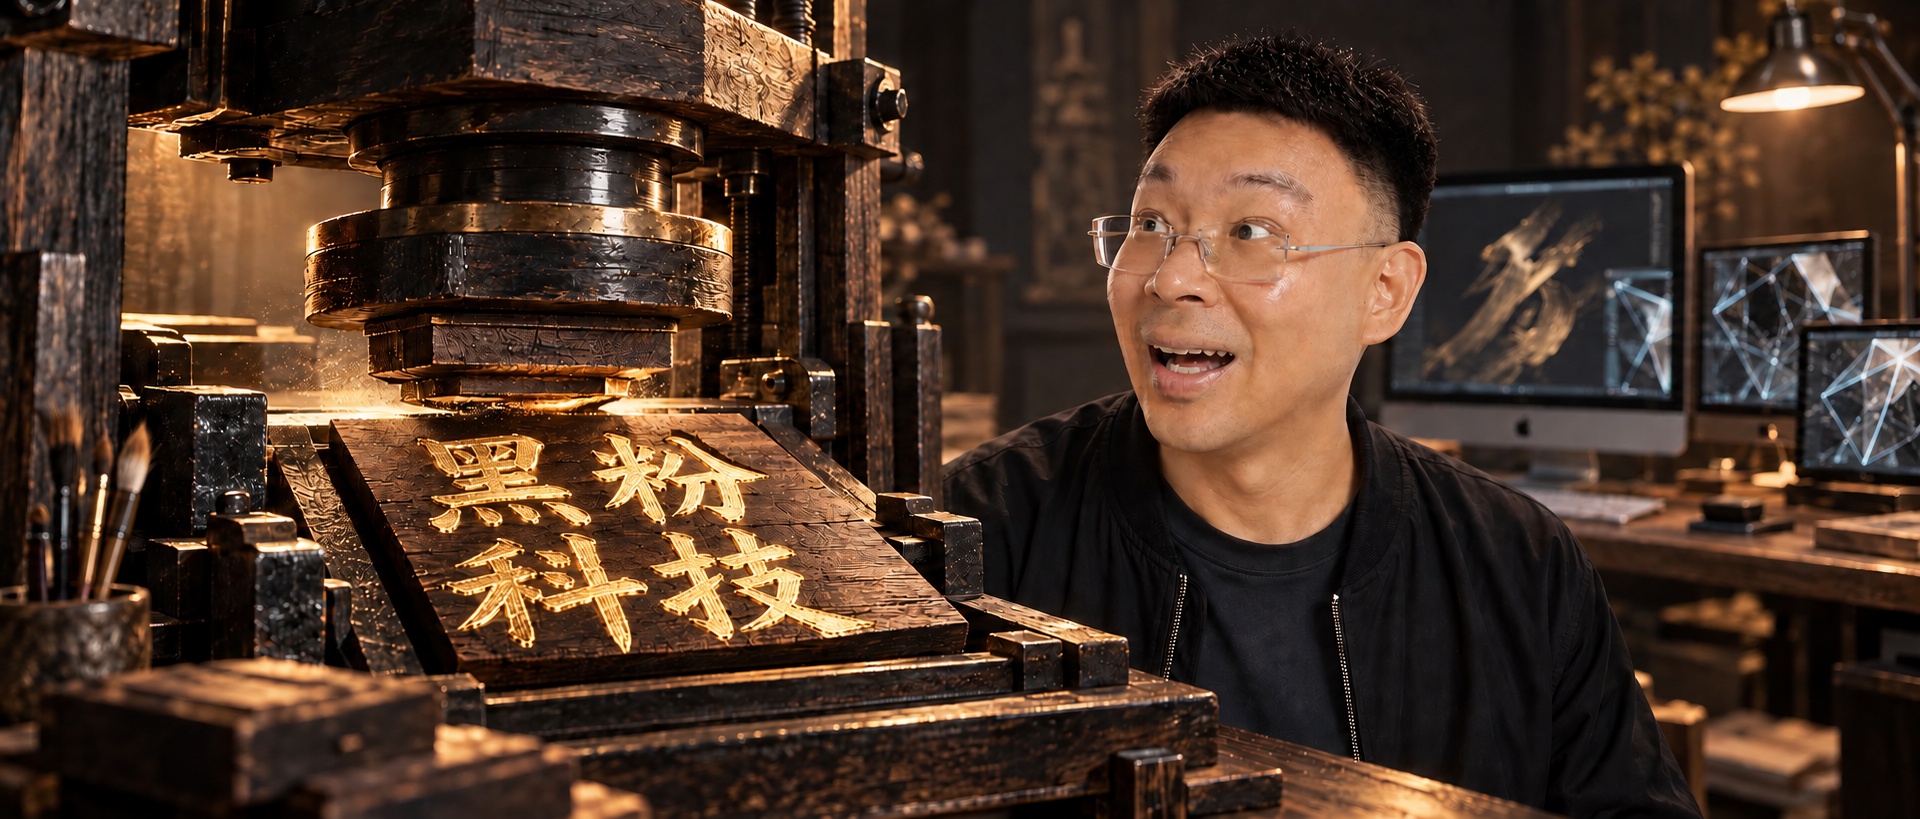
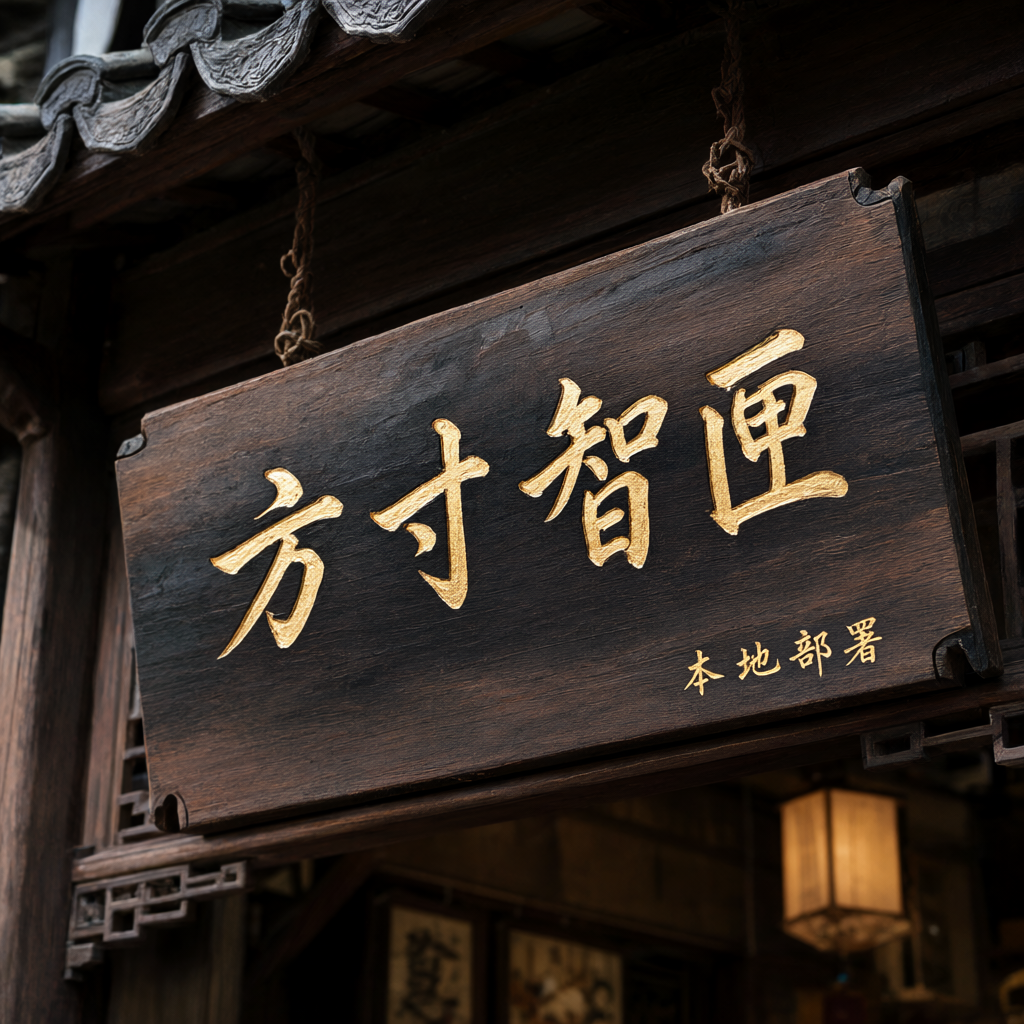
To put the conclusion first: **This model is worth installing because it’s in Chinese. **It can write the four large gold-lacquered regular script characters “LocalBrain” on a wooden plaque, and also write “Wishful Thinking” vertically in the upper left corner of the ink lotus pond. The speed is 1024×1024, 20 steps 69 seconds on the M5 Pro. But the three pitfalls between “weight reduction” and “first image” are more worth mentioning than speed.
Let’s first talk about what was tested this time and what counted as passing
This time, I’m not running benchmark scores. What I want to answer is a very specific question: **What does it cost to connect it to a local app already running Z-Image? **
So there are three acceptance criteria: can weights be fully loaded; can the same code path be fed to two models simultaneously; and whether the resulting graphs are worth “31 GiB hard drives.” I only record speed from a single test and don’t compare across engines—I haven’t installed other inference engines, so I can’t do that kind of comparison.
The machine is an M5 Pro, 20-core GPU, and 64GB unified memory. Weight is loaded into Metal with bf16, and no CPU uninstallation was done. All the numbers below are calculated from this machine and its configuration.
Weight 30.8 GiB, loading time 15 seconds
Tip First, let’s look at what it consists of. This is not a monolithic model, but an assembly line of four parts assembled:
| Components | What is it? | Weighty authority |
|---|---|---|
text_encoder |
Qwen3-VL-8B | 16.33 GiB (4 cells) |
transformer |
QwenImage21Transformer2DModel | 13.25 GiB (2 cells) |
vae |
AutoencoderKLQwenImage21 | 1.26 GiB |
processor / scheduler |
Pure configuration, no weighting | — |
A total of 30.8 GiB. The text encoder is even larger than the part shown in the diagram—an 8-billion-parameter visual language model is dedicated to reading your prompt. This also explains why it can write Chinese correctly: the half that understands Chinese characters is already a proper Chinese large model.
It took 15 seconds to load from disk to Metal memory. After that, the cost for each image was fixed: 1024×1024, 20 steps took 69 seconds; I ran four consecutive 28 steps: 90.9, 89.1, 94.0, and 98.6 seconds. The number of steps and time were basically linear, no surprises.
The first pitfall: missing a library and not reporting this error
Tip The first time I click generate, it reports this:
ImportError: Qwen3VLVideoProcessor requires the Torchvision library but it was not found
Its processor is Qwen3VLProcessor, which pulls up Qwen3VLVideoProcessor, and the latter relies on torchvision. My environment doesn’t have it—because the original Z-Image didn’t need it.
The real frustration of this pitfall is that it avoids all pre-checks. After installing the application and running environment, it immediately checks from diffusers import QwenImage21Pipeline, which passes, because that’s just importing a class. You have to wait until from_pretrained actually loads the processor, and the missing library is exposed.
In other words: you only see this error when you install the environment, see the green “Installation Complete,” download 31 GiB, and click generate. **Import-level checks can’t block load-level dependencies. **I’ve now added TorchVision to the dependency list, and in the post-installation check, I added a import torchvision—if you can ask about it right after installation, don’t wait until the user clicks generate.
The second pitfall: the same parameters in two models have different names
Tip After installing TorchVision, the assembly line loads successfully. Clicking again, I got a mistake:
TypeError: QwenImage21Pipeline.__call__() got an unexpected keyword argument 'guidance_scale'
Tip I went to read the signature, and the contrast was very clean:
| Assembly line | Guidance parameters |
|---|---|
ZImagePipeline |
guidance_scale |
QwenImage21Pipeline |
true_cfg_scale, none guidance_scale |
And my code has locked the former in place. Z-Image has always been normal, so this assumption has never been questioned.
For the amendment, I chose ‘ask for signatures’ instead of ‘assign by model name’: the program reads the actual parameter table of the pipeline __call__ and passes whatever name it recognizes. This way, in the future, when entering the third pipeline, you don’t need to change it here.
By the way, here’s a detail worth knowing: the default value for true_cfg_scale is 1.0, and the official documentation is very straightforward—this model meant to be sampled without guidance, so it should not be guided sampling; it must be greater than 1** and have a negative prompt to be enabled. When I first tested it, I passed on 4.0, and it replied with a direct reminder that it didn’t enable it because there was no negative prompt. This means my default parameters are too high for this model, but I didn’t change it this time—that’s a user-adjustable setting, and changing the default value affects more than this time.
Third pitfall: I made the code correctly, but I made the wrong part
After changing parameter names, I wrote a little script to test it myself, and it passed on the first try. Happily, I downloaded it into the app and clicked generate—
name 'inspect' is not defined
The import inspect I added is at the beginning of the server file. But the actual generation isn’t on the server, but on a worker subprocess it pulls. That code is passed as an independent string to python -c, not sharing any import from the server.
This pitfall made me note: The clone script I wrote myself can never detect it because the clone script doesn’t even have a ‘child process’ layer. A structure that only exists on the real path can only be tested on the real path. After the modification, I ran the main system again and got the image in 69 seconds.
How about the image: Chinese is its home turf
All four maps are 1024×1024, 28 moves, with prompts formed in one go and no repeated card draws.
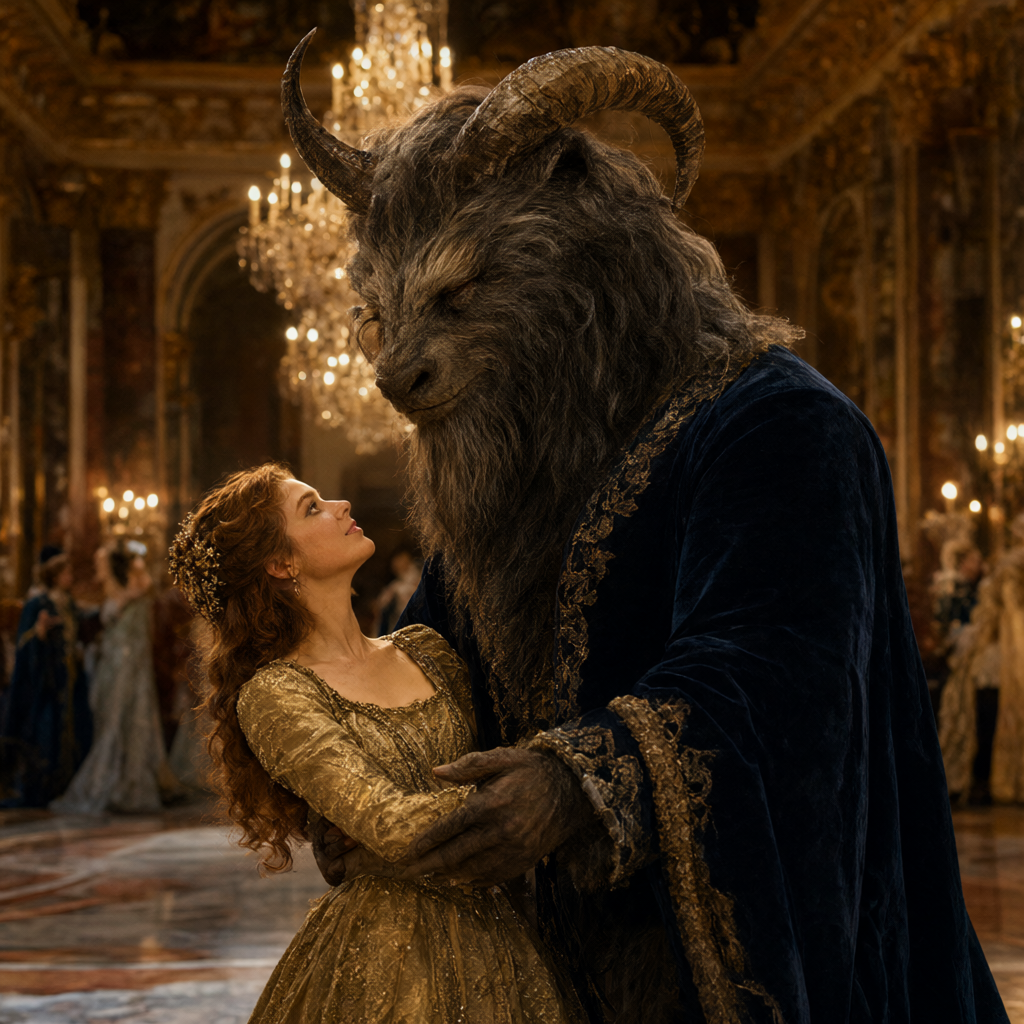
Beauty and the Beast is a pure visual skill: the curvature of the beast’s horns, the layers of the mane, the reflection of the golden skirt’s fabric, the blurred depth of field of the dancers in the background—none of these are slumped.
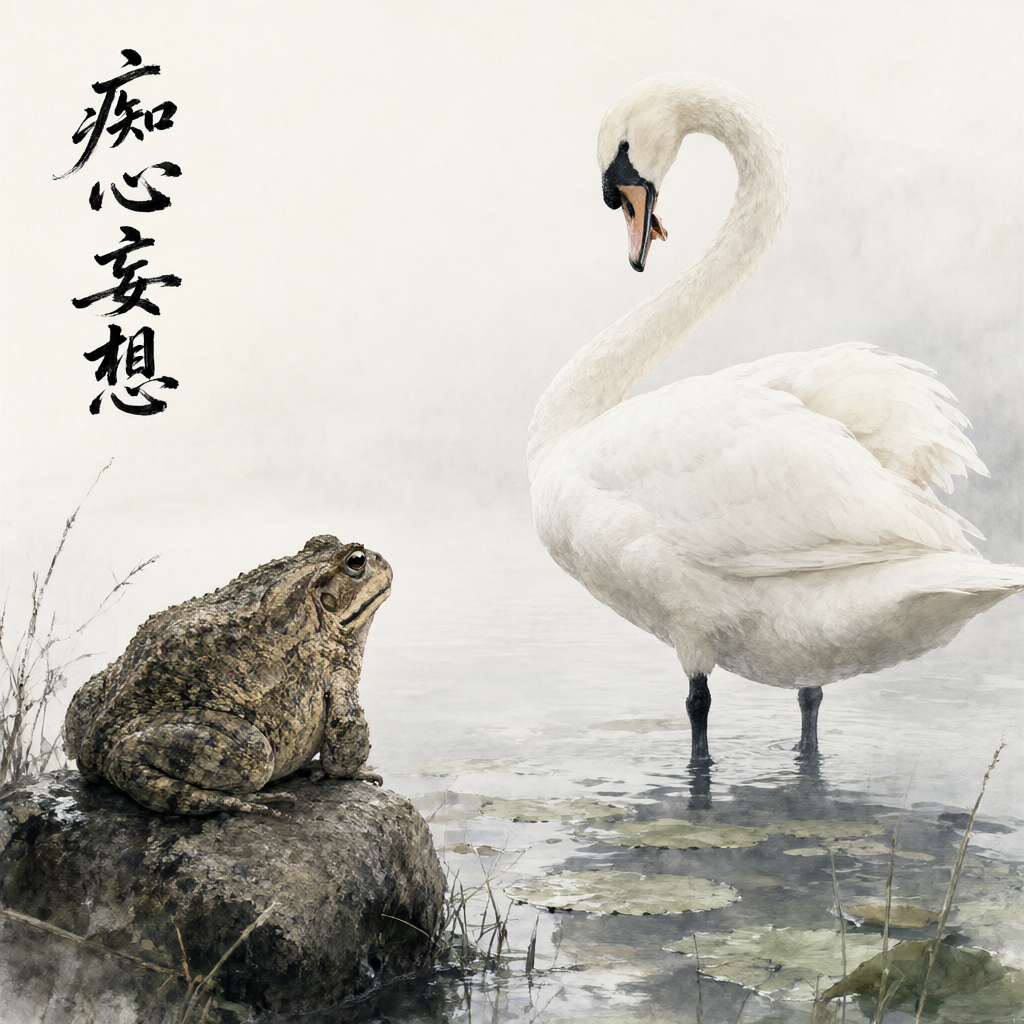
This is what really caught my eye. The four brush characters in the upper left corner—**’ meaning ‘Wishful Thinking’—are one of them, not bad, vertical layout, with both brush tips and flying white. I’ve used many text-to-image models, and it’s rare to get four characters in Chinese perfectly correct, let alone calligraphy.
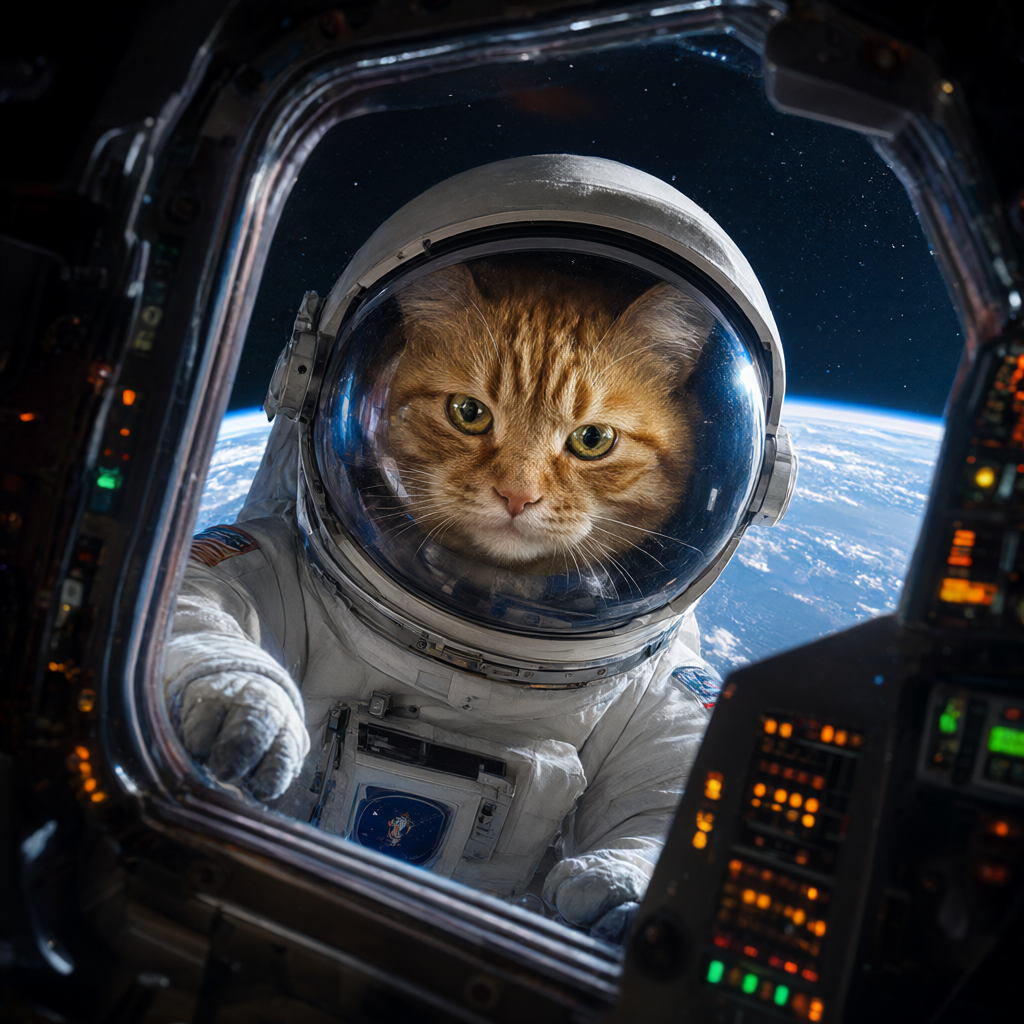
The Space Cat is used for texture: the Earth reflection on the mask, the orange-green glow on the cabin dashboard, and the cat’s eye highlights—these three layers of light don’t clash.
There are also things I haven’t achieved. For that signboard, I requested the small text in the lower right corner vertical ** "Local Deployment," but it was written horizontally. The four large characters are completely correct, and the small text placement is correct too, just didn’t hear the direction of the layout. I won’t go over this point: its Chinese is strong, but it’s not exactly what you point to.
Reference image: It’s actually ‘one assembly line, two types of work’
Next is the part I specifically verified this time. In Qwen-Image-2.1, the __call__ contains a image parameter, which reads the source code clearly in the documentation:
One or more condition images……encoded by the text encoder as vision context and by the VAE into latent tokens prepended to the noise.
Three things: multiple images allowed; Reference images follow two paths (text encoders act as visual context, VAE is programmed into potential tokens and pinned before noise); Transmission lists represent “a set of images shared in the entire batch,” not one image paired with a single prompt.
Another very useful point: When no dimensions are specified, output follows the aspect ratio of the reference image (the original document says Derived from the condition image’s aspect ratio if omitted).
I used a pre-generated orange cat image as a reference and asked to swap it for the snow:
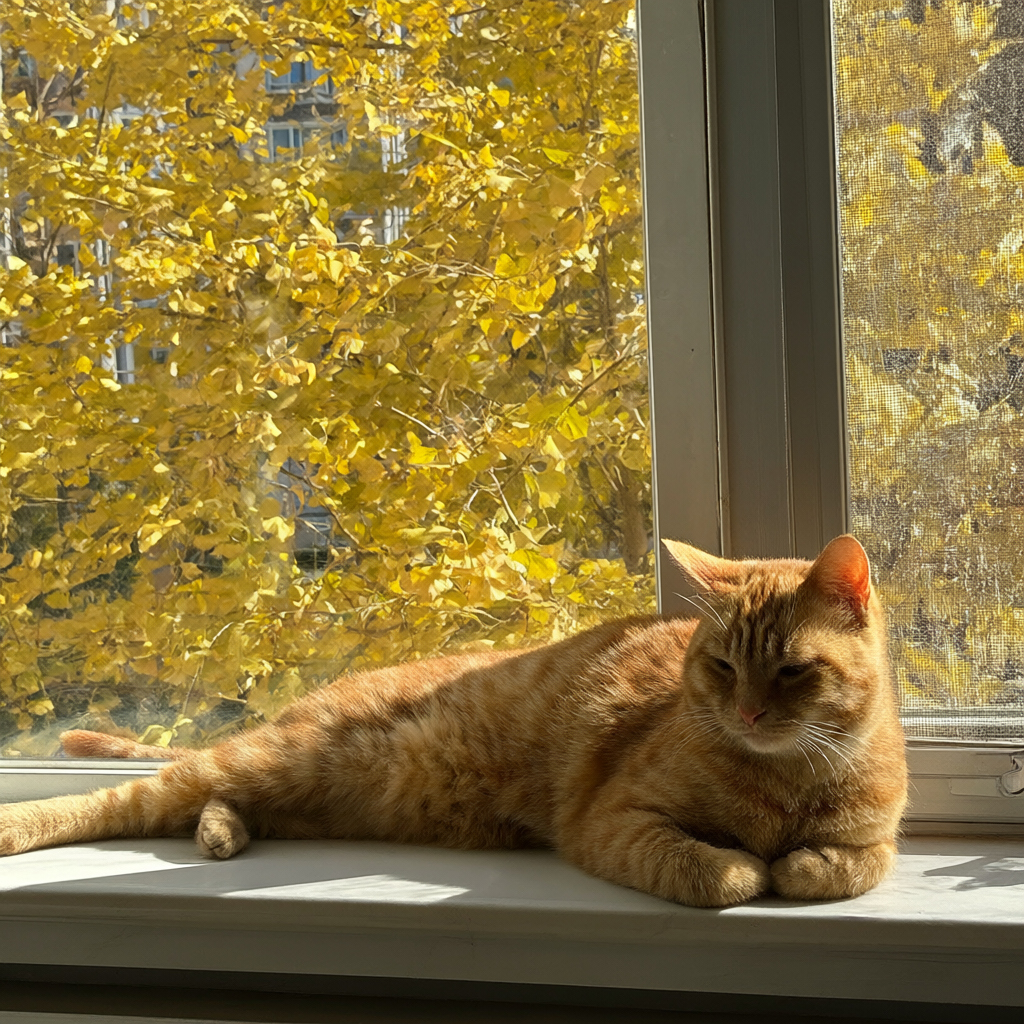
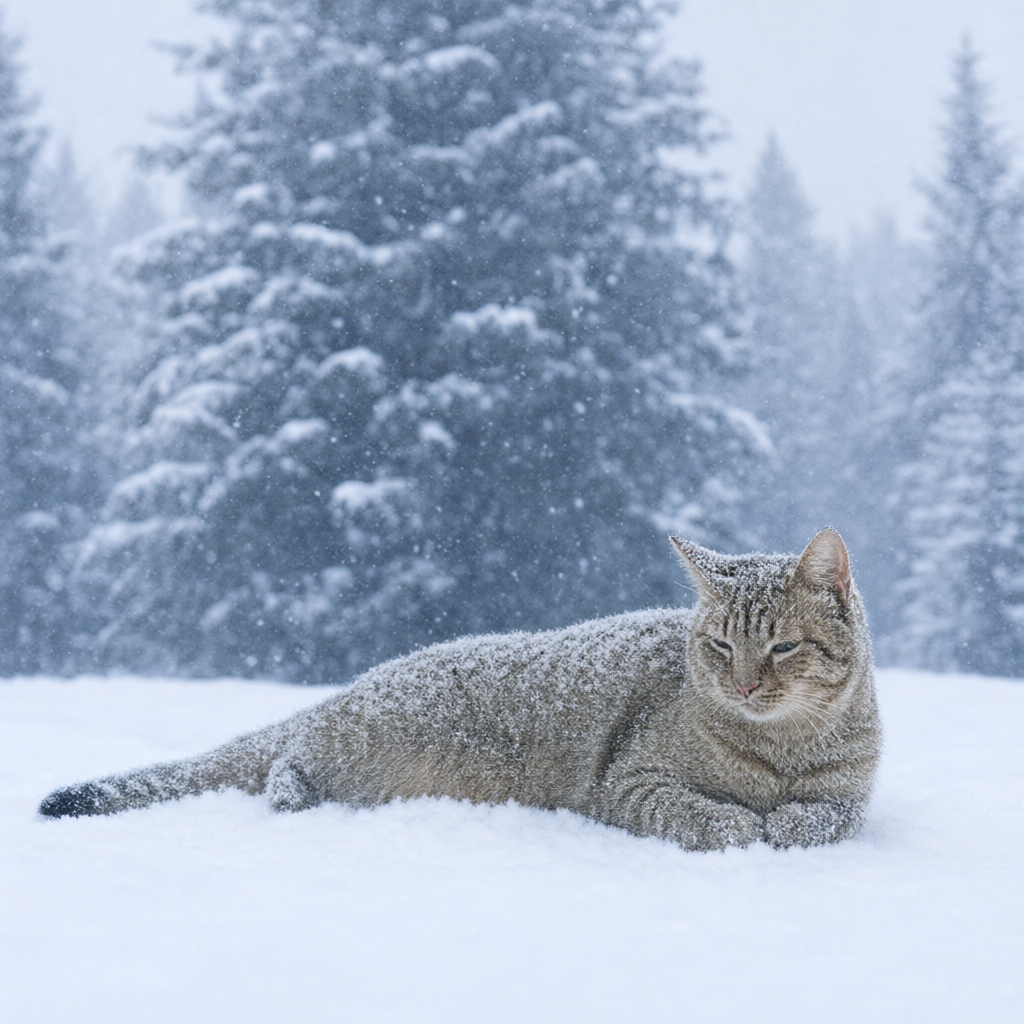
82 seconds. Posture, body shape, tail movement, squinting expression—all of them were brought over. The scene was replaced according to the prompt, and snow had fallen on its fur. The color temperature was cooled by the snowy scene; the orange was no longer as obvious as before—the pattern was still recognizable, but the requirement to “keep the same cat” wasn’t perfect.
🎯 The official website listed four improvements, and I ran through three that could be verified on the spot
This article originally only answered one question: Can it output images on my machine? **But of the four improvements listed in the official model card, three are functional and verifiable on the spot—native transparency, retouching, multiple reference images. Next, I’ll run each item one by one, using the previous baseline (1024×1024, 20 steps, seed 42), and running the same weights installed by LocalBrain.
| Official statement | Tested on this device |
|---|---|
| Native Transparency — Generates regular or transparent (RGBA) images directly from text, edits transparent layers, and cuts out subjects from photos | True. Straight-out RGBA, about 80 seconds; Transparent region accounts for 43.5% (see criteria below) |
| Versatile Editing — Supports up to 10 reference images, which can be circled, annotated, or individually masked for specific modifications, while preserving the identity of people and products | Two reference images are usable (86.5 seconds); But this version of diffusers’ pipeline does not have a mask parameter, so I can’t follow the circle and annotation method |
| Compact and Efficient — The visual generation part only has 7B parameters (32-layer single-stream DiT) | Weight 30.8 GiB, loading time 11–15 seconds, consistent with the original; Retouched photo takes 78.8 seconds |
| Realistic Textures — Better layout, portrait lighting, and details | The original Chinese four-character calligraphy has been verified; This time, it will not be repeated |
The left column is the Chinese translation of the model card’s original text, and the right column shows the single test results for the local M5 Pro / 64 GB. Batch stability is not extrapolated
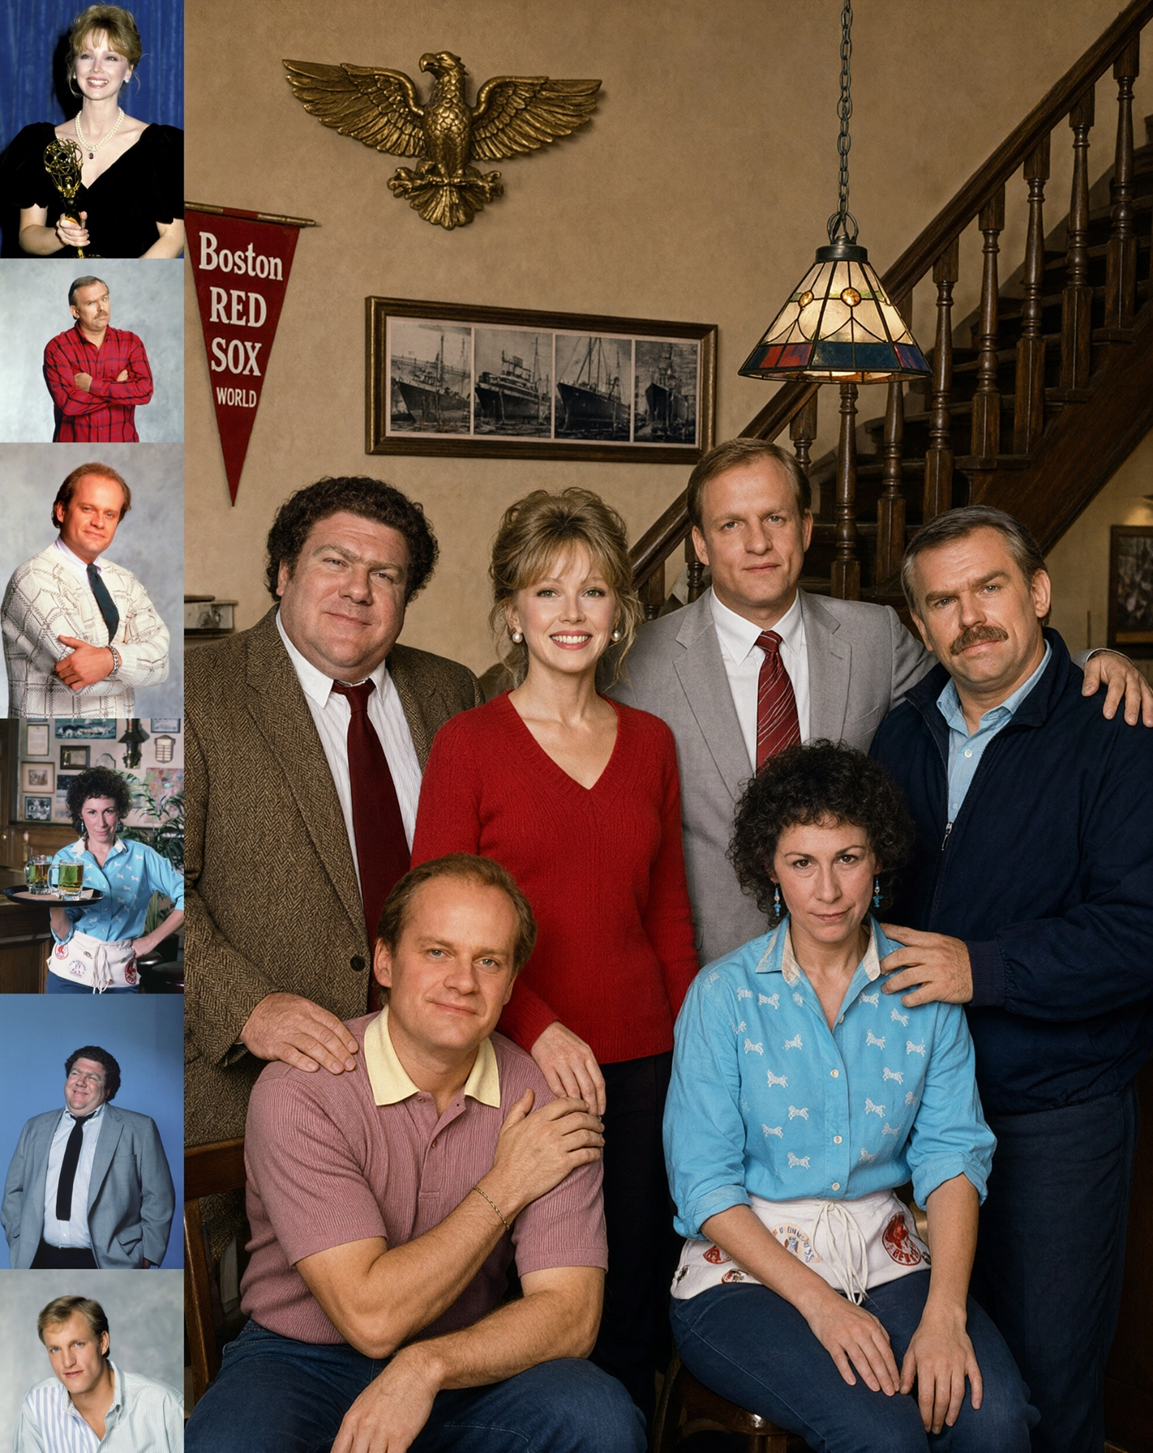
The official sample looks like this—on the left is native transparent generation, on the right is a group portrait referenced from six portraits. These two are official, not my own creation. I’m here to show the stated upper limit:

(1) No background: alpha is not 0, but 1
The transparency thread has an officially recommended prompt format—copy it directly, don’t overdo it yourself—the original text is: “This is an RGBA image with transparency. …… The image has alpha channel and the background is transparent.” Just sandwich the subject you want to draw in the middle.

**This item was almost judged dead by my own criteria. **The first time I counted the pixels (alpha is strictly 0), I counted them as ‘completely transparent pixels’ (alpha is strictly 0), and the result was only 0.6%, which seemed like the function didn’t work at all. Looking at the histogram, I found that 440,000 pixels fall under alpha = 1, not 0—the model gives it near-full transparency, not hard zero. If the criterion is changed to alpha ≤ 8, the transparency area immediately becomes 43.5%.
Tip **When doing local testing, the most likely to fail isn’t the model, but the ruler you wrote yourself. **If I had only looked at the first version of the numbers this time, I’d have concluded that ‘the transparency feature is basically useless,’ but it’s actually fine. When the numbers are abnormal, first doubt the criteria.
(2) Retouching: Just let it change the background, don’t let the cat move
Photo editing means inserting the original image into image=, with prompts only telling you what to change. I used the orange cat image created by Mr. Zao in this article as input, with the command “Change the background to a dusk cedar forest, keeping the cat unchanged”:
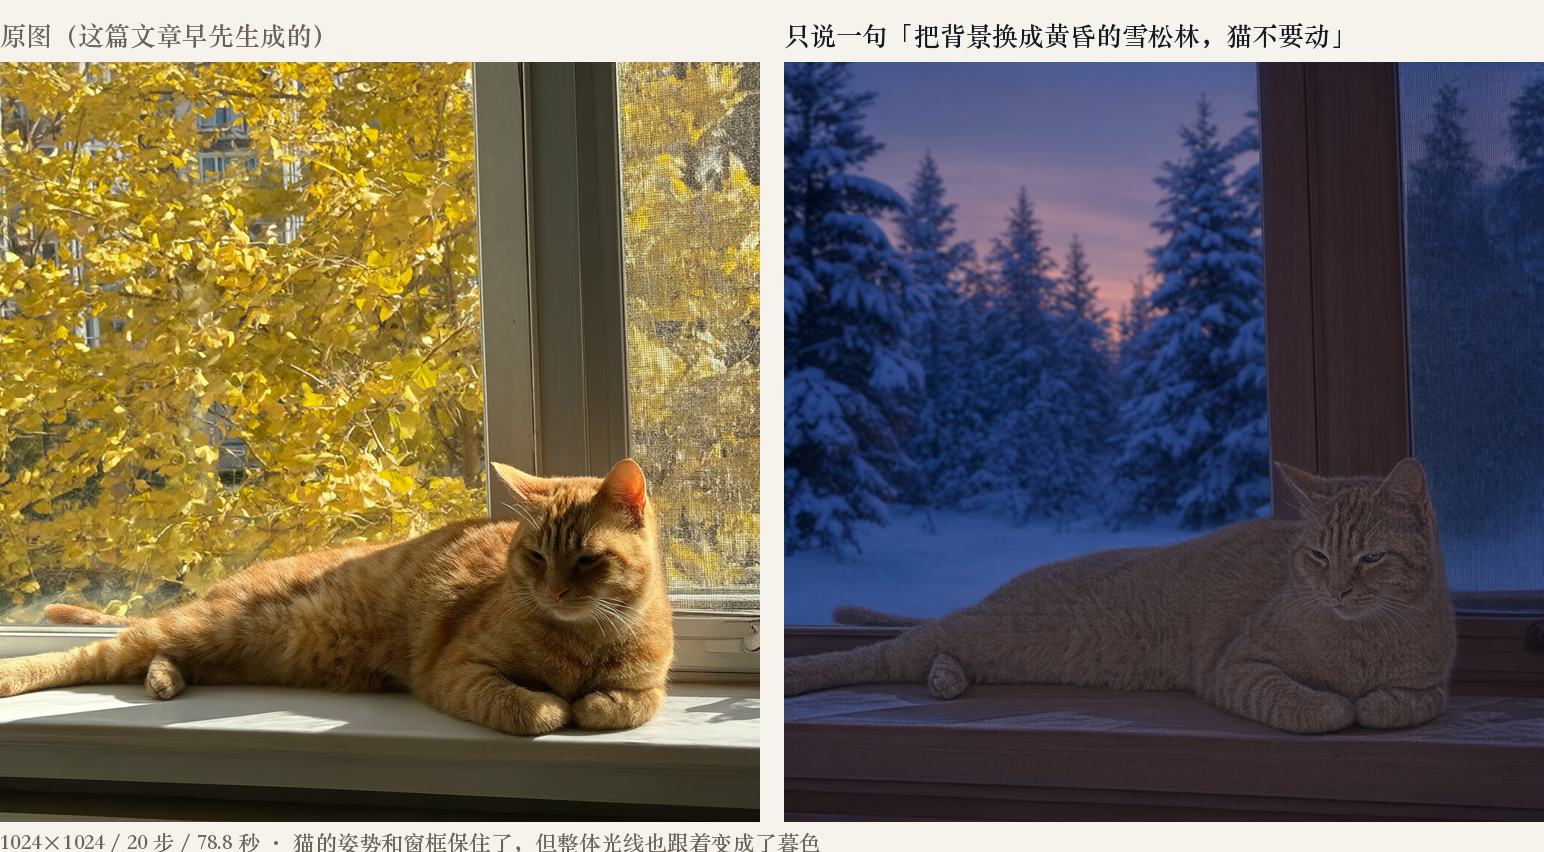
The cat’s posture, paw position, and window frame perspective are all preserved, but the background is changed to a cedar forest. But to be honest: **it’s not just the background. **The lighting in the whole image turns to dusk, and the warm glow on the cat is gone. Judging by the word ‘dusk,’ this is correct, but if you want pure background replacement and a completely unchanged foreground, this version can’t deliver—the official circles and masks are for that, and I can’t take that path: the parameter table for the diffusers pipeline only includes image, negative_prompt, true_cfg_scale, height, width, no mask-related references.
(3) Reference image: This time I really fed two cards
The original text leaves a tail note in this section: “I only tested a single reference image. The documentation says multiple images are supported; I verified that parameter types accept lists, but didn’t actually feed two images to check the effect.” Now adding — image= Just send a list directly.
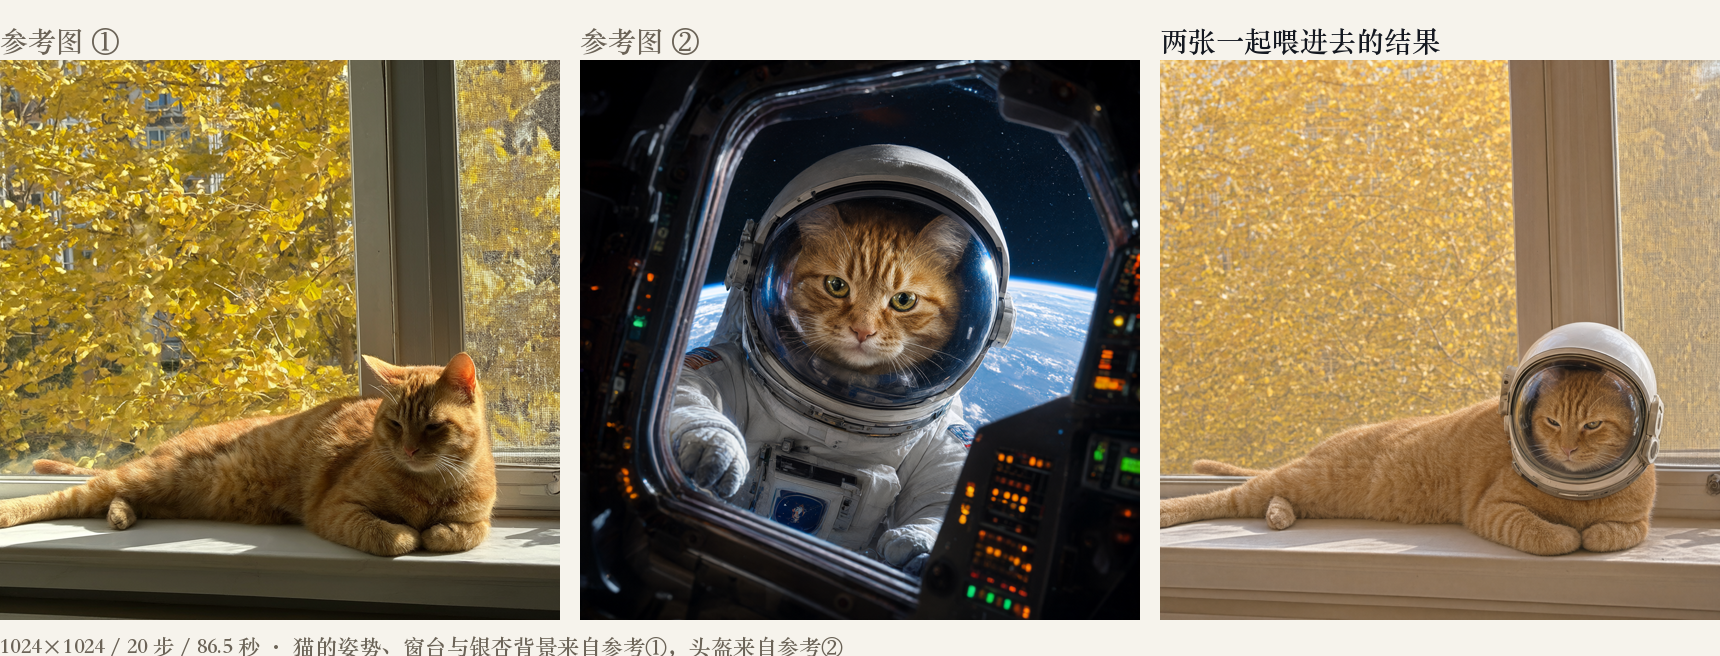
For the same image and 20 steps, giving only one reference image takes 71.7 seconds, giving two takes 86.5 seconds—adding one more reference image means paying 21% more time.
(4) Out of five generations, two are empty, not because of the model
After running all of the above, I initiated five generation attempts, and two times returned a fully transparent image (all alpha is 0, file only 4 KB). The first reaction was ‘Multiple images are not supported,’ the second was ‘The prompt says sticker, so it gives a transparent sticker’—neither is correct. **
Sort the five times by process, and the pattern will appear: **Each process only has its first generation as good. **
| process | This process generates the first time | This process generates the second time |
|---|---|---|
| Process One | (1) Transparent stickers ✅ | (Script error interrupted) |
| Process Two | (2) Photo ✅ retouching | (3) Fully transparent empty image ❌ |
| Process Three | (4) Two reference images ✅ | (5) Single reference image: Fully transparent blank image ❌ |
| Process 4 (Dedicated Verification) | The same prompt is the first ✅ time: There is a screen | Same prompt second ❌ time: Fully transparent empty image |
It is unrelated to the prompt, number of reference images, or transparency; It only depends on “how many times this process has generated.”
To confirm this, I started another process, using exactly the same prompt, the same reference image, and the same seed twice: the first time the screen appeared (RGB average 137.1), the second time the entire image was fully transparent (RGB average 0.0). The only variable left was “which time.”
Tip **So this isn’t a model capability issue, it’s the state of this pipeline in MPS. **The practical method is clever but effective: Only one process is generated, or the pipeline is rebuilt each time. In LocalBrain, each raw image is an independent round, which happens to bypass it—this also explains why the original text never ran into one after testing.
Warning **Almost wrote two wrong conclusions. **First was ‘multi-image not supported’ (in reality, two images were enough at once), then ‘the prompt mentioned sticker, so it’s transparent’ (in fact, the photographic prompt was still empty). Both times, I used the result of a single attempt to explain the phenomenon, without fixing the variable and running it over again. **Don’t rush to attribute the exception; first do single-variable comparison. **
🔁 Second time: Change to a human portrait, because the official three points refer to people
The previous round used cats and stickers. Only after running did I realize: the official model card says “Portrait and Product Fidelity,” “Character Light and Shadow,” and “Text Layout”—**Of these three, the cat can’t verify any of them. **So a few days later, I ran again, changed the main body to a human, switched parameters to 40 steps, 832×1248 vertical layout, and ran LocalBrain’s built-in image_server.py resident service, no longer directly connected to scripts.
Transparent: This time it’s the whole person, with the hem of the skirt trailing in the tail
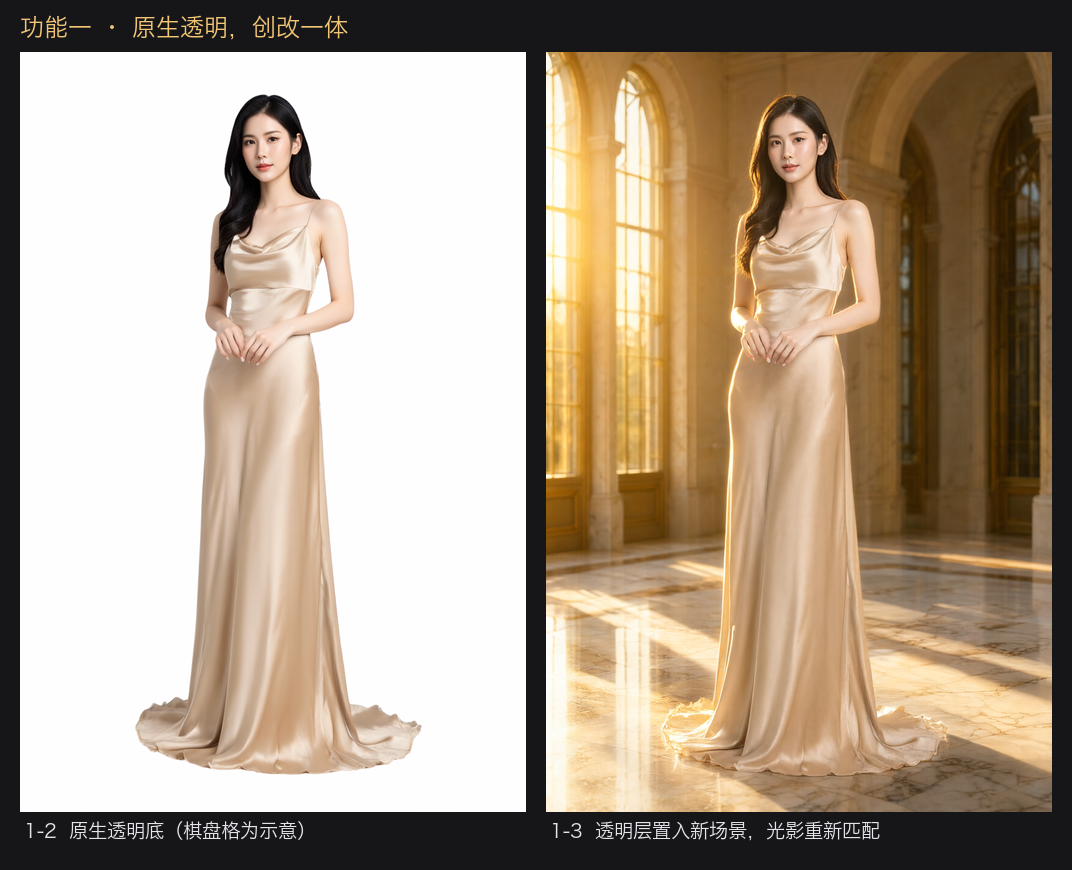
The sticker is easy to pick, not easy for people; the difficulty lies in the hair strands and semi-transparent fabric. On the left is a straight-out RGBA pad checkerboard: alpha ≤ 31’s transparent area accounts for 76.5%, the main body (alpha ≥ 224) accounts for 23.1%, and the middle transition zone is only 0.4%. Such a narrow transition strip means it provides a crisp mask, not a patchy soft edge.
On the right is the transparent image used as a reference, with the requirement to place it in the sunlit marble atrium. It’s more than just a background: the warm light from the left window shines back on the person, the ground is projected, and the marble is reflected. This is the same behavior I saw the first time I used the cat—changing the background would change the light along with it—this time, it got it right.
Portrait Fidelity: Earrings are the best witnesses
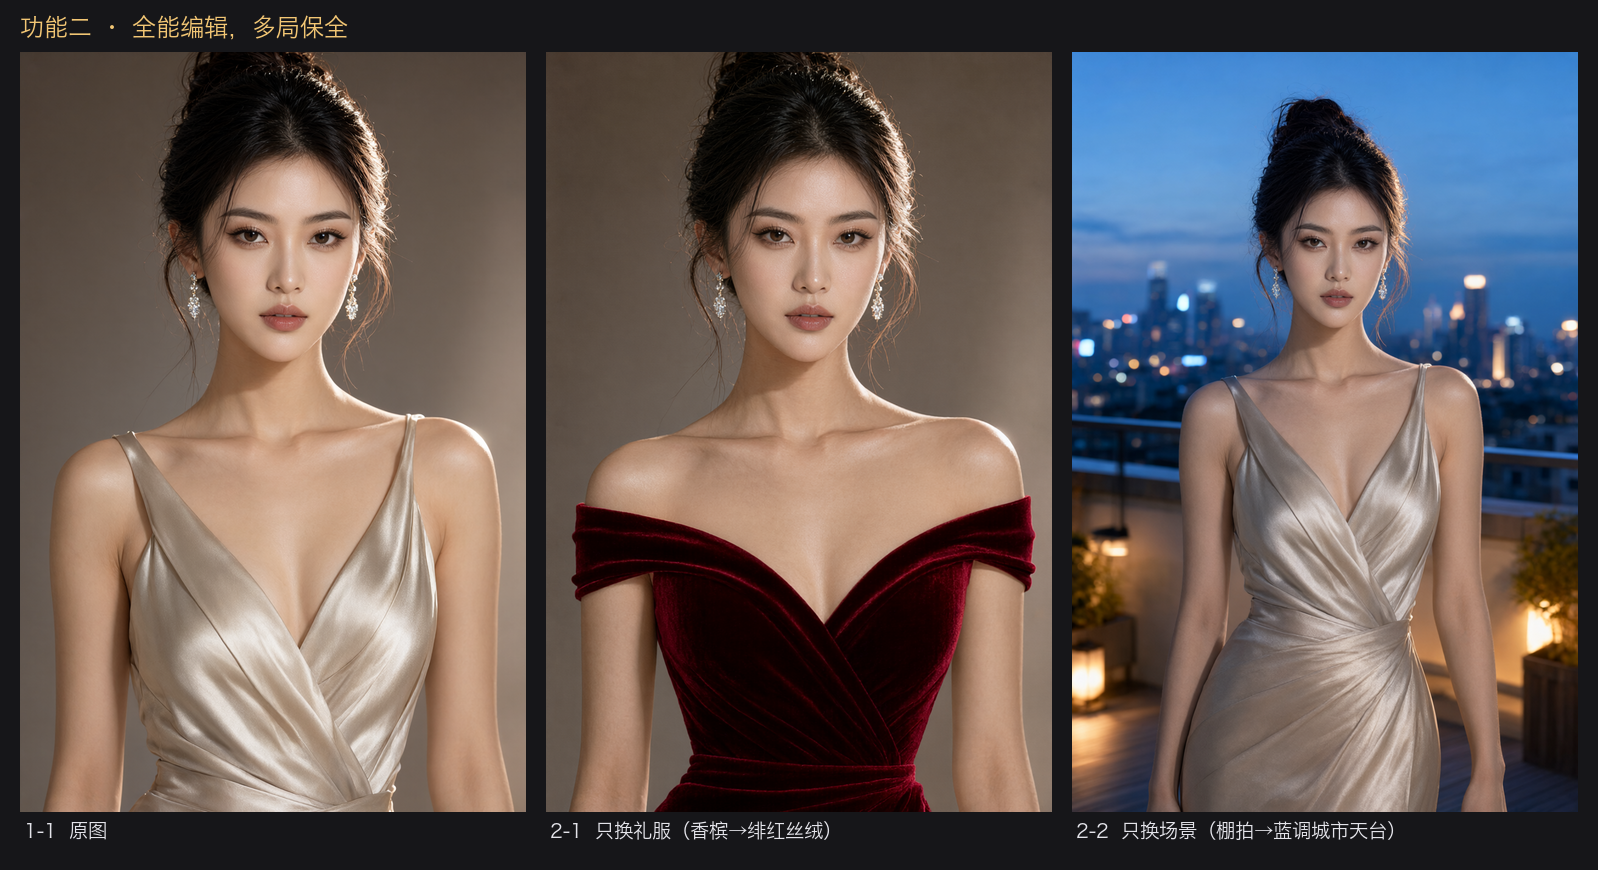
The two instructions were: “Only replace champagne silk with crimson velvet, nothing else” and “Only swap studio shots for blues city rooftop.” Looking at the whole canvas, the changes were indeed made; To see the unchanged, you have to zoom in on the face:
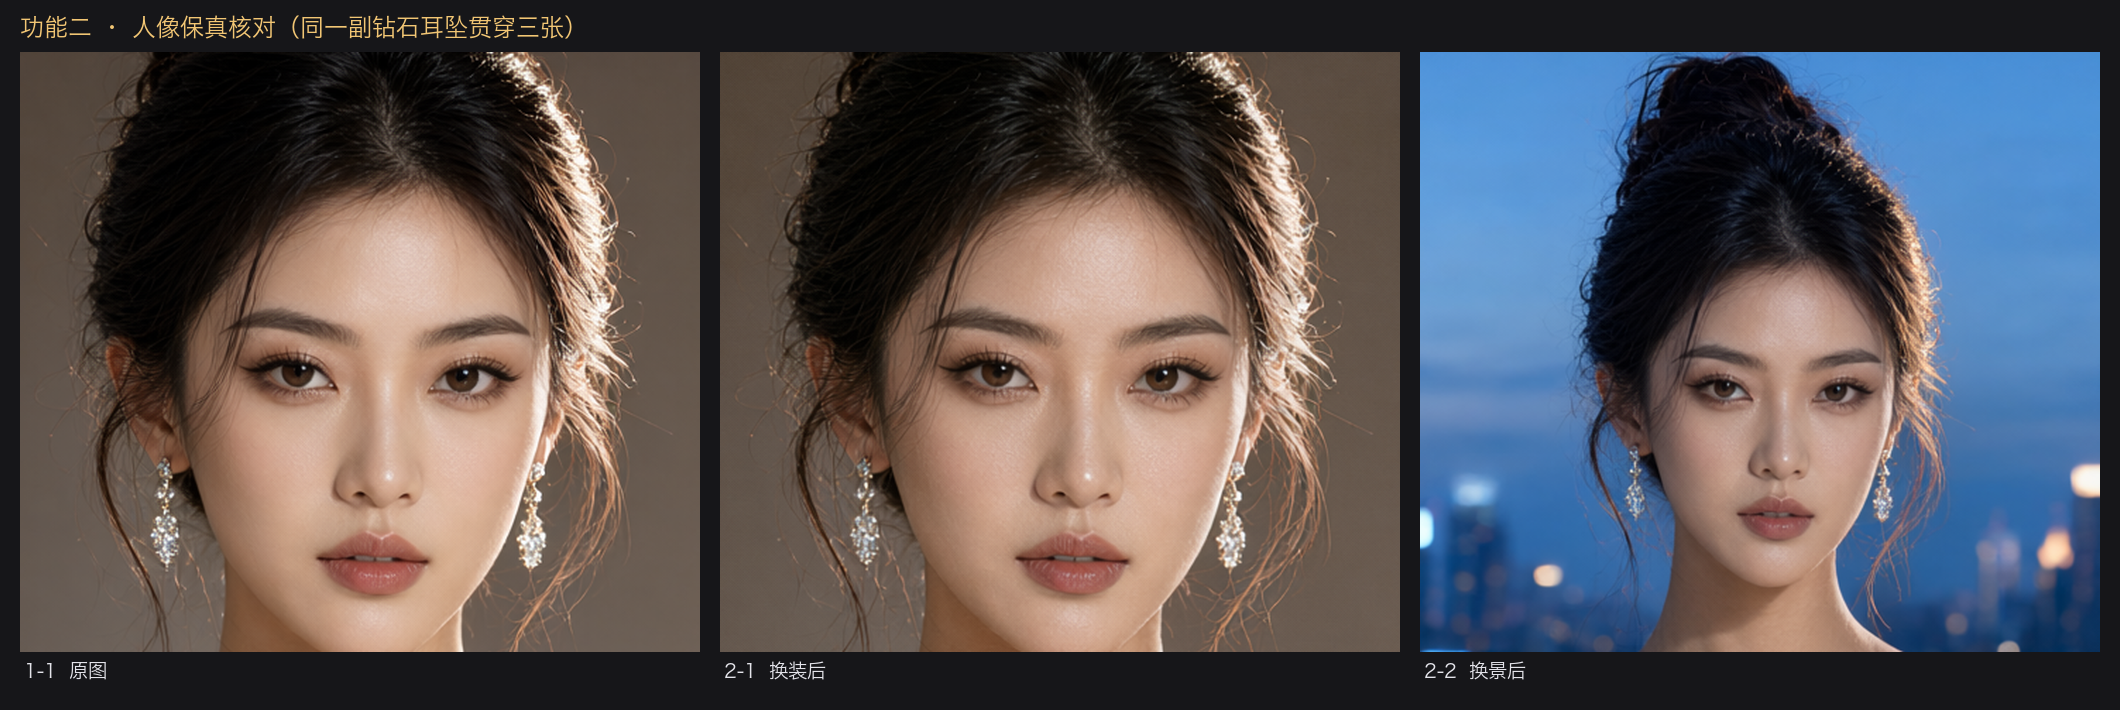
Zooming in to the face: the facial features, bun, and stray hair direction all match. **The most illustrative example is the diamond earrings—all three are the same, not even the pendant’s forks change. **These small, high-frequency details are easiest to lose in redrawing, but this one didn’t.
Product authenticity: I first judged it was not acceptable, then realized the footage I gave was too small
I almost got this one wrong.
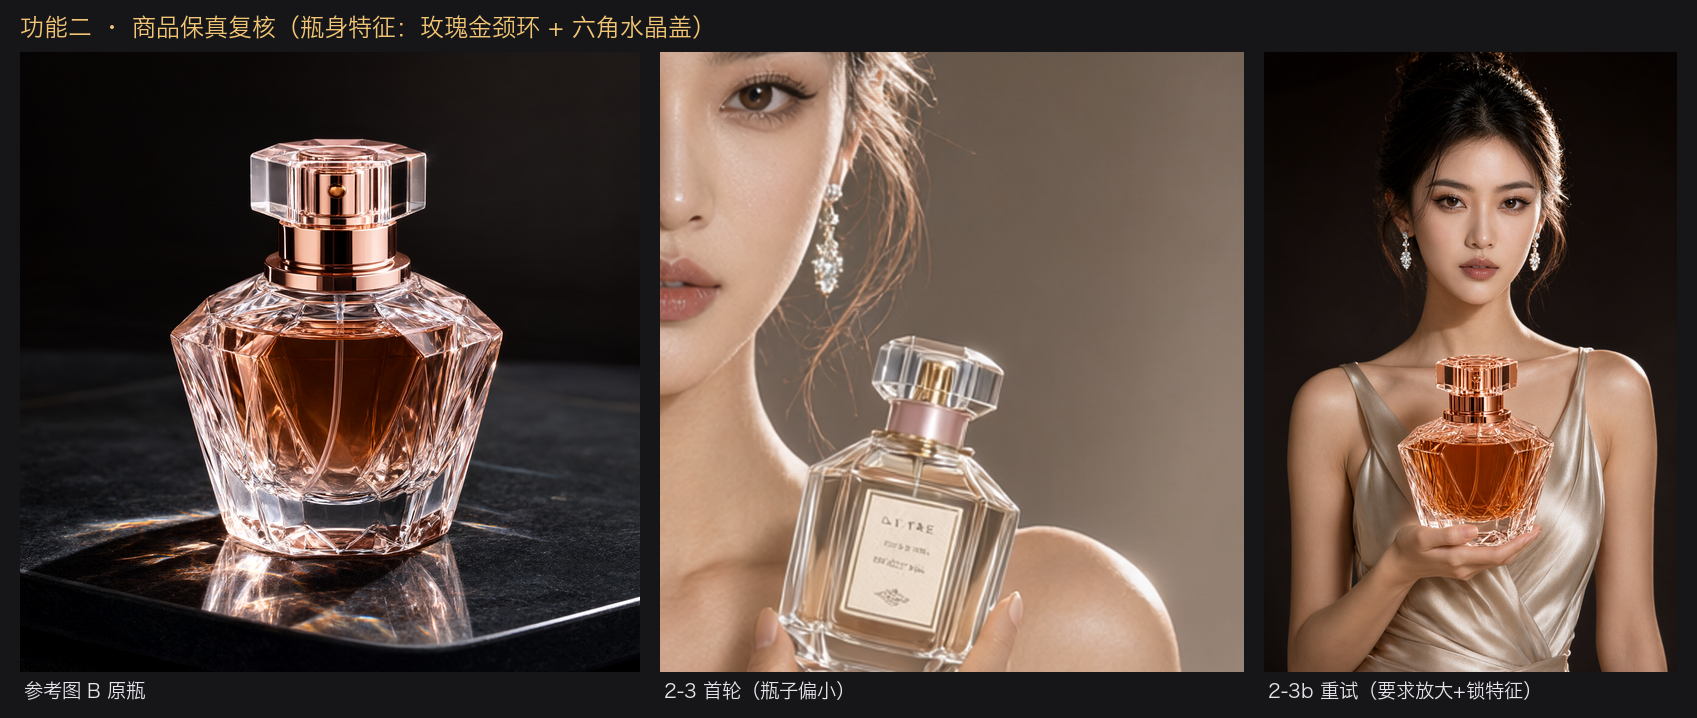
There are two identifying features of the reference bottle: rose gold neck ring and large hexagonal crystal cap. The first time, I had the model hold the bottle by the shoulder, and the bottle turned out to be noticeably smaller—the neck ring was gone, the cap turned into a silver-white small cap, and a label appeared out of thin air, both features were lost. Just looking at this time, the conclusion was: ‘Portrait authenticity holds, product authenticity doesn’t.’
But the bottle only takes up a small portion in the frame, so judging the model by that is unfair. So I re-fed the same two reference images, changing only two things: **Require the bottle to be enlarged up to the chest, and write the neck ring and hexagonal cap in the prompt phrase fixed. **On the right, the rose gold neck ring is back, the hexagonal cut cover is back, amber liquid and no label are correct, and the portrait is still preserved.
Tip **So ‘product authenticity’ isn’t a true/false question, it’s a size question. **For the same model and two reference images, how much the product occupies the image directly determines whether it can be preserved. Use it for e-commerce images—don’t let the product shrink into a corner.
Elegant Characters: Three layouts, not a single character in Chinese is distorted
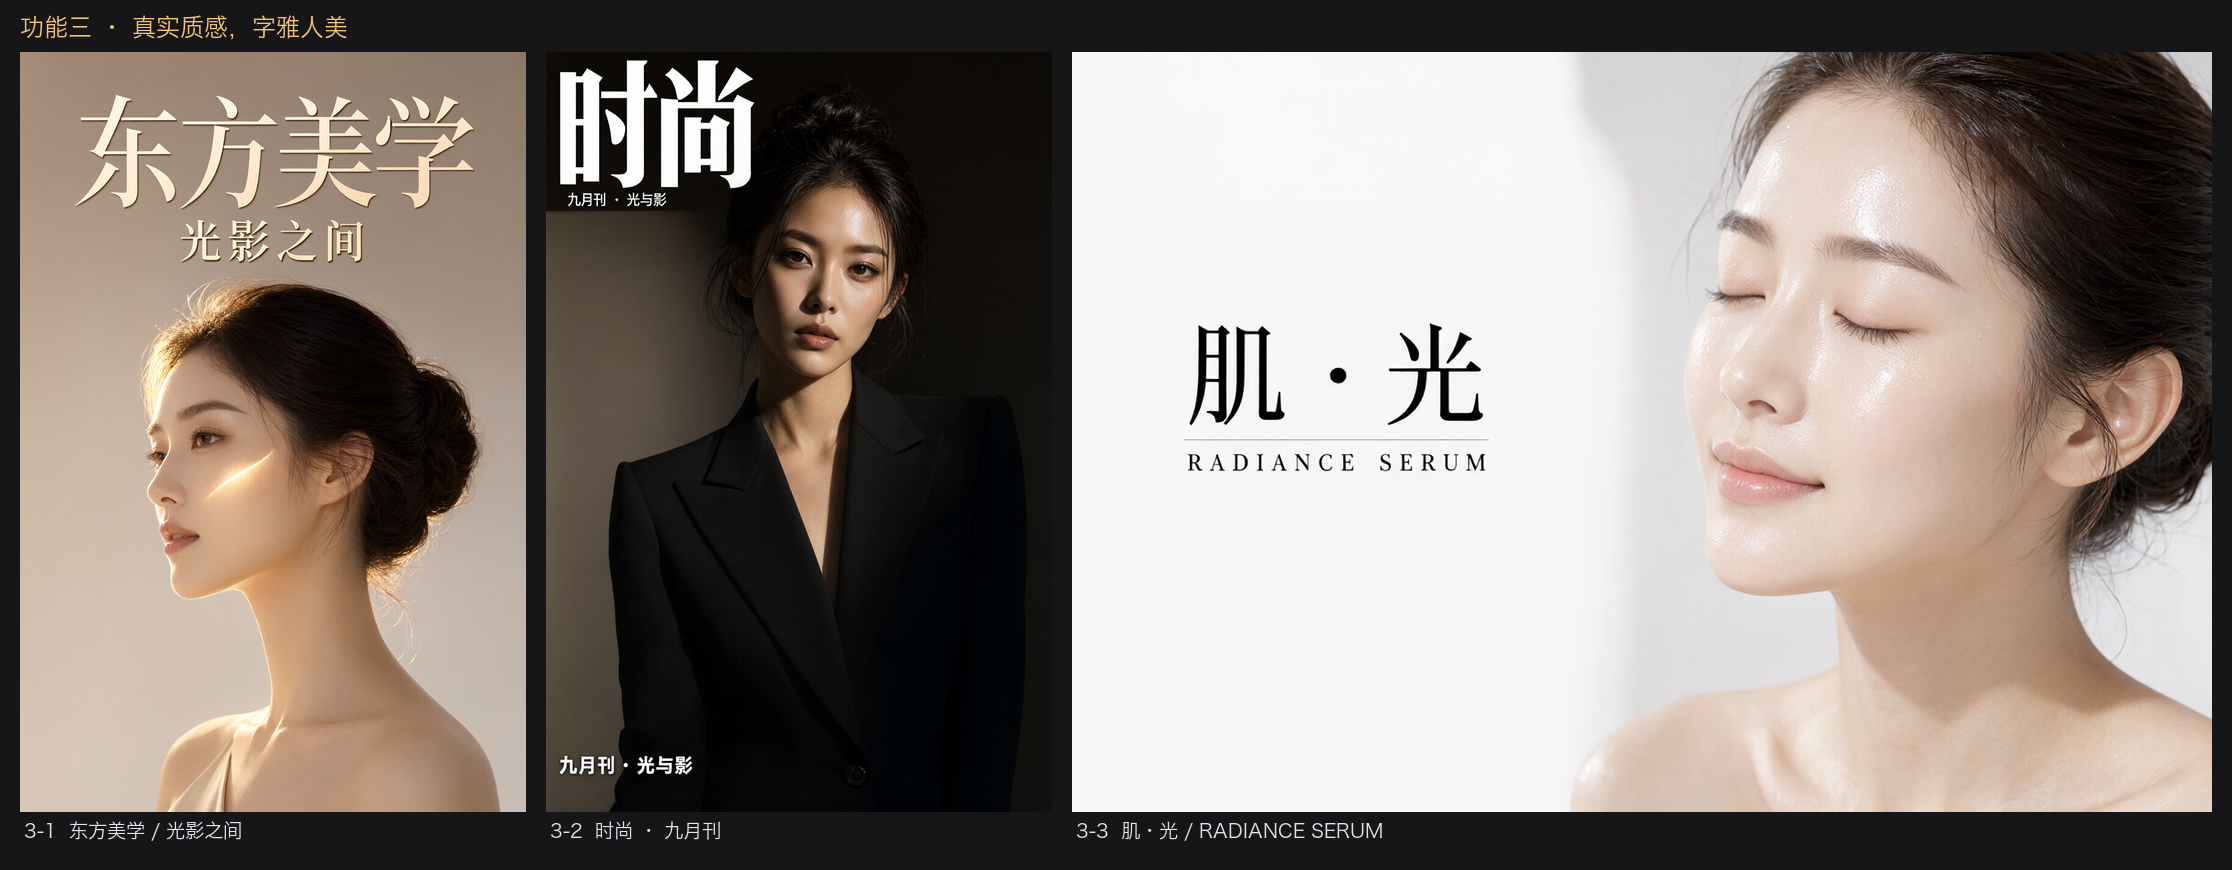
The original text only tested the four characters on a plaque. This time, three different real layouts were used: the poster’s main headline “Eastern Aesthetics” with the subtitle “Between Light and Shadow,” the magazine title “Fashion” with the cover line “September Issue · Light and Shadow,” the horizontal product advertisement “Muscle · Light” with the English subline “RADIANCE SERUM.” All nineteen Chinese characters are correct; the character spacing, serif thickness, and the alignment of the mixed Chinese-English baseline are all at a level that can be used directly—the last one even added a thin separatoring line between Chinese and English.
There’s one issue to nitpick: for the magazine cover, I only requested a line of cover line in the lower left corner, but it added another line of the same text below the magazine title. This is layout redundancy, not a font error.
Fourth pitfall: Only accept the path in the reference image, not the base64
image_server.py reference image for only accepts absolute local path. I encoded the image as data:image/png;base64,... according to OpenAI’s usual practice, passed it over, and the server used it as os.path.isfile(), which was checked as not existing and returned 400. I only realized this was intentional when I checked the line of comments in the source code:
Accept only local paths—this service only serves the local caller on 127.0.0.1, so there’s no reason to decode another layer of base64, as that would increase the request body to several MB and mix decoding failures with generation failures.
The reason holds up. It’s just that the error message stops at a bare 400, and the caller can’t tell if it’s ‘formatting incorrect’ or ‘the image is really gone.’
Incidentally, I corrected the two numbers from the previous round
**First, the bug with the blank image didn’t appear again this round. **Run image_server.py The resident service ran thirteen images in a row, many of which included reference images, and none were empty. The previous round’s ‘one process only generates one page’ rule worked for direct scripts; But for LocalBrain’s resident service, it seems unnecessary.
**Second, the previous line, ‘Adding one more reference image means paying 21% more time,’ doesn’t hold up. **After checking the receipt, I realized that the single shot used as the baseline (71.7 seconds) actually produced an empty image (rgb_mean is 0.0)—using a failed generation as the baseline doesn’t count as 21%. Here’s a more basic comparison: running the same prompt and the same seed twice, the output SHA-256 is exactly the same, but the time is 79.7 seconds versus 129.6 seconds, a 63% difference. The noise from a single timing run on this machine is this loud, so all the seconds in this article should be taken as magnitude and not used as percentages.
How to use these three items in LocalBrain
I directly connected the above three items to the weighted ones to make it easier to leave receipts. Is it really that troublesome to use in daily life? In LocalBrain, on the homepage or multimedia tool’s “Launch Model” dropdown, select Qwen-Image-2.1. You can add reference images at the bottom of the image creation panel; transparency copies the official format in the prompt; edit the original image into the reference slot, and only state the parts to be changed in the prompt.
Warning **Distinguish between time consumption and metrics. **The above 65.8 / 78.8 / 86.5 seconds are the model’s cost on this machine, excluding interface queuing, resource arbitrage, and model warm-up. Clicking once in the app will make the viewing experience slower than this number—that part belongs to the application, not the model’s account.
What can these prove, and what cannot?
Provable: Under the conditions of M5 Pro, 64GB, and bf16, it can stably produce 1024×1024 images, 20 steps in 69 seconds; It can write Chinese four-character calligraphy correctly; Reference images can capture the posture and expression of the subject.
Cannot prove, there are four things I need to clarify proactively:
First, I did not conduct cross-model cross-evaluation. I did not run another text-to-image model on the same machine for the same topic comparison, so I cannot say “which one is better.”
Second, one image cannot prove batch stability. I only ran once for each subject, without repeat sampling or seed retesting. The calligraphy sheet where four characters were written correctly does not mean you can still correct by changing four characters.
Third, I didn’t use the measured version. I used the official bf16 weight, so 31 GiB means 31 GiB. I didn’t touch this round at all.
Fourth, I only tested a single image for reference images. The documentation says multiple images are supported; I checked the parameter type acceptance list but didn’t actually feed two images to check the effect. The interface worked, but the effect didn’t work.
Who will pay for it, and who won’t
This setup is straightforward. Those who lose out are those with limited memory: With 31 GiB weight and activation, 32GB machines basically can’t get in, 48GB is barely enough, and 64GB is more comfortable. Plus, its text encoder is an 8B visual language model, so this memory can’t be skipped.
**The silent side is quantization. **The publisher of open weighting has no motivation to tell you “how to cut this size on consumer-grade machines”—that’s the community’s job. Only when someone releases a quant version with acceptable quality will the score be recalculated.
There’s another timeline worth mentioning separately, as it directly determines whether you can install it: support for Qwen-Image-2.1 (diffusers’ PR #14804) was merged into main** on **2026-09-18), and diffusers’ last release v0.40.0 was 2026-08-20—no released version can load it. So the dependency must be nailed to that merge commit, which self-reports version number 0.41.0.dev0. Same goes for the text encoder: Qwen3-VL-8B requires transformers ≥ 5.17, while 5.17.0 was only released on 2026-09-09.
**The difference between a model’s “Released” and “You can install it” can be over a month. **During this period, anyone who installs dependencies according to the distribution will only get a confusing error message.
I want to run it all myself
- Hardware threshold: Apple Silicon and 64GB unified memory are quite reliable; bf16 weight 31 GiB, save enough hard drive first.
- Dependencies:d iffusers must be stubbed to commit (distributions can’t do it), transformers ≥ 5.17, don’t forget torchvision—it’s the easiest to miss this time, and the errors that leave it are far from the real cause.
- Parameters: Use
true_cfg_scalefor guidance, default 1.0 is fine; This model is originally designed without guided sampling. If you want to use a reference image, passimagewithout specifying the size so it follows the scale of the reference image. - In LocalBrain: On the homepage or multimedia tool, select Qwen-Image-2.1 from the “Start Model” dropdown. You can add reference images at the bottom of the image creation panel, and select “Follow Reference Images” for the frame. If the selected model does not support reference images, the backend will clearly report an error and will not quietly ignore your image.
Back to the initial “Stuck three times.” Out of the three times, two error messages failed to point to the real cause—the missing torchvision reported a video processing class, and the error correction layer reported an unused variable name. **The most expensive thing for local deployment has never been video memory, but this “error and cause separated by three layers” time. **This article was written to help the next installer get stuck twice less.
🧰 Tools I build
I maintain all of these tools myself. Preview builds are clearly labeled; the release pages are the source of truth for downloads, updates and known limits.
Info: HyphenBox Status: Official releases
A radar for free LLM APIs: availability is re-tested continuously, one local interface for all of them, and keys stay on your machine
Info: LocalBrain Status: Official releases
A multimodal MCP toolbox for local models: TTS, Whisper and video generation in one place
Info: ScreenLex Status: Official releases
Learn new words while you watch shows. Free, for Mac and Windows
Info: HyphenScreen Status: Official releases
Screen recording and smart editing in one: a DaVinci-style timeline, automatic redaction and a check of the finished video before export. Free
Quote: HyphenTech Make AI your superpower Local deployment · Free resources · Self-made software https://hyphentech.top
Late nights and burned API credits went in,a cup of tea comes back out — only if you feel like it.
Scan with WeChatPress and hold to save the image, then open it from your album in WeChat Scan

Comments
Loading comments…