

Info: Machine translation This post was machine-translated from the Chinese original. Wording may be rough in places — the Chinese version is authoritative.
The girl in the yellow raincoat holds the paper crane in her palm, and the crane takes flight; In the garden above the sea of clouds, the skirt moves with the butterfly; In the forest, there is also a piano. Let’s look at these passages first: they are all generated by this M5 Pro Mac with 64GB unified memory, using LocalBrain to call the local model.
Each lasts about 3.04 seconds. Kamitsuke and Huayuan use H3 four-step acceleration, waiting 177.55 seconds and 171.49 seconds respectively; Piano uses the LTX-2.5 standard distillation process, waiting 79.87 seconds. Different subjects, frames, and algorithms are used; treat these numbers as practical references for how long it takes to make a material. To determine who is faster, go back to the same topic for comparison.
This time, what I want to answer is: after putting a video model into your tool, how to choose to save time: when to use the four-step approach, when to need the first and last frames, and when to do a rough shot rehearsal. The test was divided into independent pipeline comparison on November 1, ultra-short call from the 2.2.7 installer, and six creative sample clips from the 2.2.8 candidate version on November 2. This article reorganized the original footage and receipts without rerunning the model.
Dynamic preview is displayed at original speed, with no sound in GIFs; Blogs and recorded reading versions can open the full original audio video. The official account retains dynamic footage and keyframes; for full audio, please play it at the blog entry at the end of the article.
First, clarify three things: wait a little longer, smooth transitions, and shoot according to the camera
| Problems to be solved | The abilities used in this issue | Input that needs to be prepared |
|---|---|---|
| A quick look at creative directions | H3 Four-step or Eight-Step Acceleration | Prompt; Provide reference images in the selected method |
| Moving from one image to another | LTX Transition | Description of the first frame, final frame, and transitions |
| Start by arranging movement and composition | LTX Layout to Render | Geometric preview videos, isogram appearance reference drawings, descriptions |
LoRA can be understood as replacing a set of tuning parts on an existing machine. The uses of these parts vary: some teach models to calculate fewer rounds, some focus on transition continuity, and some receive shots and geometric positions. Calling any of these “image enhancement switches” is easy to choose incorrectly. They still rely on the base model and inference workflow; you can’t just download a small adapter and start generation.
The source must also be distinguished. H3 Turbo comes from the LightX2V project; Transition comes from community author joyfox, trained on LTX-2.3; Layout to Render comes from the official Lightricks team. This round tests the Transition compatibility formula on LTX-2.5 to reuse existing models, and will carry this distinction into actual results later.
H3 Four Steps: How much does waiting really save?
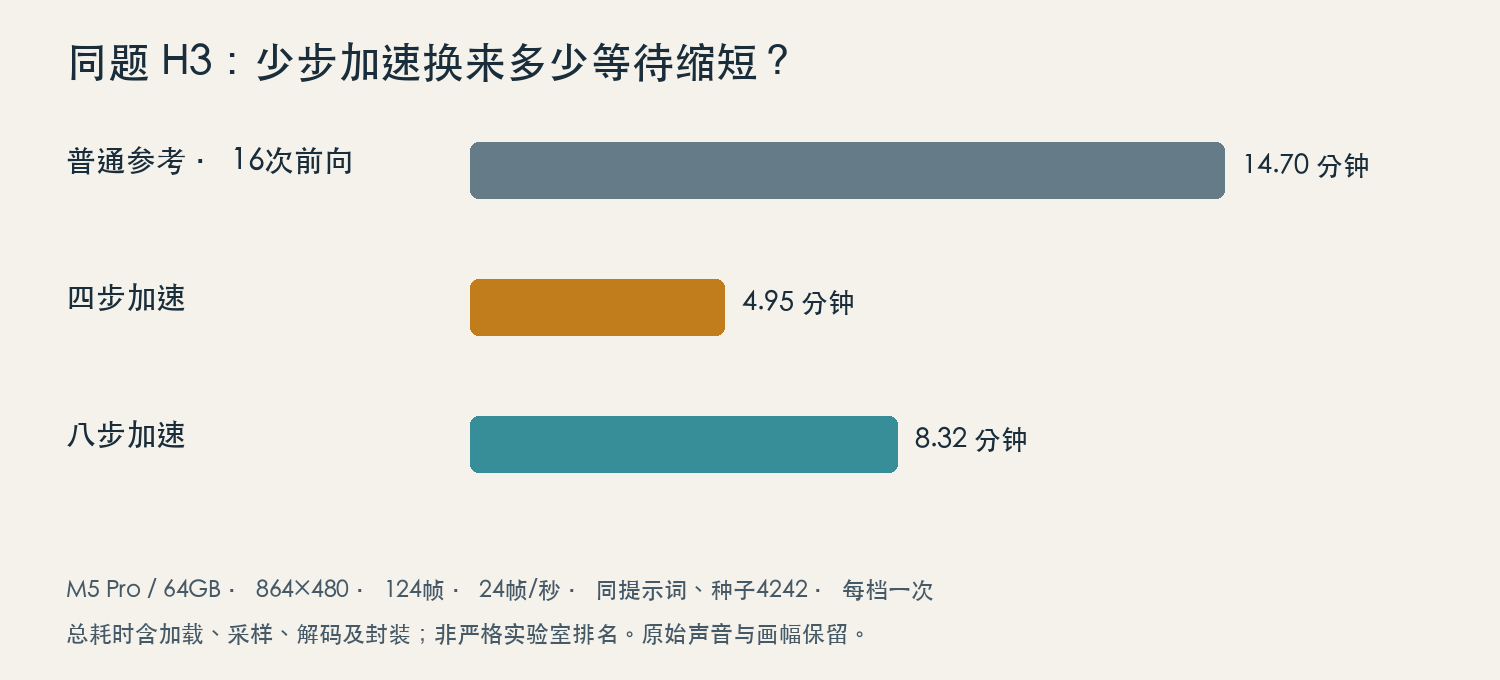
I assigned the same task to three gears: the red toy car drove forward on a light gray ground, with the camera close to the wheels following it; I wanted the car body to maintain its shape and color, with a slight motor sound and a short horn sound. Unified 864×480, 124 frames per second, 24 frames per second, seed 4242, with a final shot of about 5.17 seconds.
| Method | Total time consumed | MLX activity peak |
|---|---|---|
| General reference: 16 forward-facing times | 14 minutes 41.9 seconds | 25.68 GiB |
| Four steps of acceleration | 4 minutes 57.0 seconds | 27.22 GiB |
| Eight steps of acceleration | 8 minutes 19.4 seconds | 27.29 GiB |
Each level is used once, including current loading, sampling, decoding, and encapsulation; MLX activity peak does not equal total system memory usage.
Four-step group is about 2.97 times faster, with wait time reduced by about 66.3%; Eight-step is about 1.77 times faster. The general reference here is the 16 forward-rounded single-condition paths for this round. The first one overlapped with the last download, so I used it as a time-consuming comparison for this workflow and didn’t use it for all hardware or official high-quality recipe rankings.
“Steps” are also easy to misunderstand. They describe the number of rounds mainly calculated during the generation process, and frame counts indicate how many frames are in the finished video. Four steps can still generate 124 frames. The receipt also shows 5 sampling time points corresponding to 4 actual forward steps, so just looking at the interface or a certain steps field might misinterpret how many rounds were actually calculated.
This small car set shows the complete subject in all three gears, but the car model and camera angle vary. Four steps are best for first looking at creativity, movement, and composition; Eight steps can be tried with a different trade-off; currently, this set is not enough to definitively say eight steps will be better. Mac adaptation uses an eight-bit backbone and full 32-bit video decoding, preserving original frame and sound; This is not the same as the official full BF16 backbone’s per-numerical effects.
Switch to creative shots—let’s first see what it actually understands
| Scene | Format/Format | Approximately 3.04 seconds for the film to complete |
|---|---|---|
| Paper Crane Rain Alley | H3 Four steps / 864×480 | 177.55 seconds |
| Planet in the Palm | H3 Eight Steps / 864×480 | 279.35 seconds |
| Floating Garden | H3 Four steps / 864×480 | 171.49 seconds |
| Moon travel | H3 Four steps / 480×864 | 181.24 seconds |
| Card butterflies | LTX Normal/768×512 | 71.85 seconds |
| Forest piano | LTX Normal/768×512 | 79.87 seconds |
The paper crane’s task is quite focused: hold a paper crane in your hand, fly upward, and watch the character follow along. Using it as an insert shot is very intuitive. The palm planet must maintain the relationship between the transparent sphere, the blue planet inside, and the hand; When recording, zoom in on these boundaries to view; don’t just focus on the most beautiful frame.
Moon Travel, however, leaves a very fitting deviation: the original requirement is a “robot corgi,” but the screen shows a regular corgi and another independent robot. The image is generated, but the word combinations don’t fully follow the instructions. I keep this sample; even if you don’t cut it out, you can understand the prompt phrase.
Among the six segments, H3’s MLX activity peak is about 25.67–25.69 GiB, while LTX’s two segments are about 20.97 GiB. These two are not the total machine usage and cannot be directly combined with process RSS. Short videos are usually easier to experiment with; If you want to create continuous characters, precise dialogue, or commercial ads, you also need to test identity, hands, logos, and voice.
Transition: The first and last frames are connected, but are the wheels keeping up?
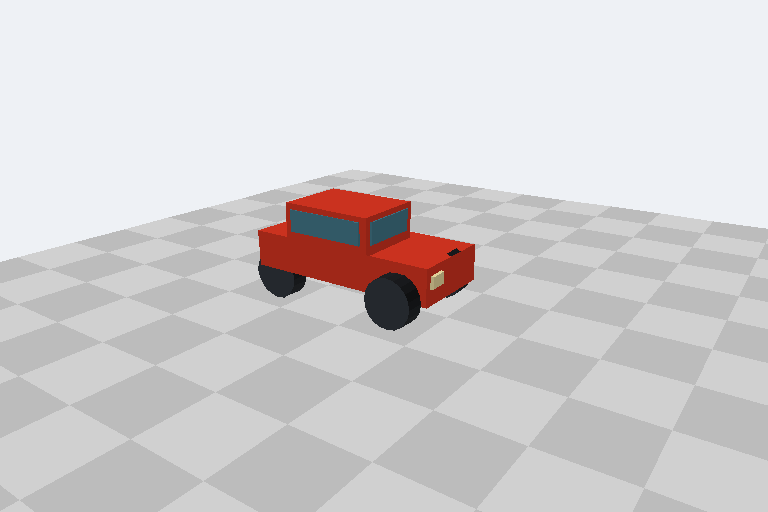
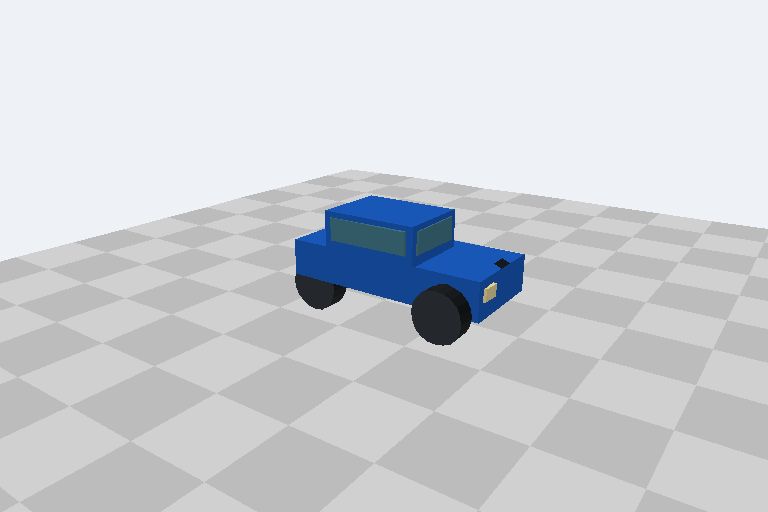
This task changes from a red car to a blue car, inputting two images while keeping the same set of seeds and sampling settings. Don’t load Transition first, then load it to see what happens in between. Compared to regular text-to-video production, the first and last frames seem to set start and end points for navigation; what the adapter needs to improve is how to navigate through the middle.
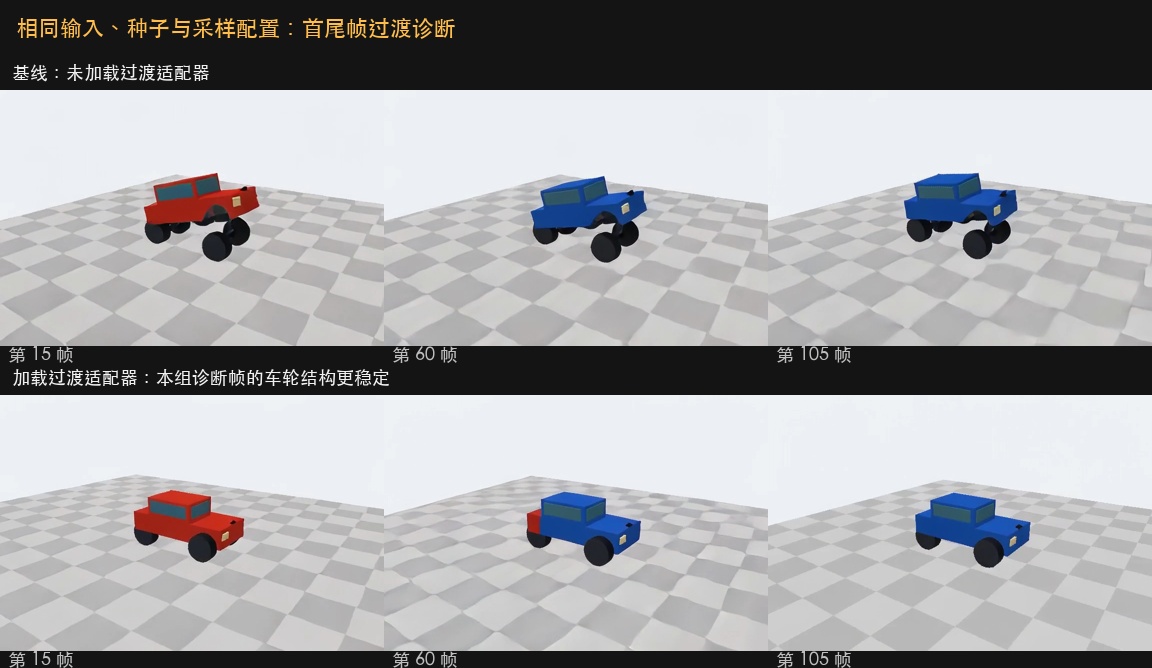
768×512, 121 frames, about 5.04 seconds; baseline time is 108.57 seconds, and after loading Transition, 112.68 seconds. Baselines at frames 15, 60, and 105 show wheel separation or deformation from the car body; After adaptation, wheel connections in these diagnostic frames become more stable, and red-blue conversion is completed. There are still color segments in the middle, but the deformation on the board floor has not disappeared.
So I use it for transitional attempts with clear start-end charts, not as an acceleration button. It uses about 4 seconds longer than this baseline. The community model was trained at 2.3, and this round of 576 adaptation layers successfully matched on 2.5; Available results have been observed; native 2.3, complex faces, and other shots still need to be verified separately.
Layout: First, give the model a rough shot rehearsal
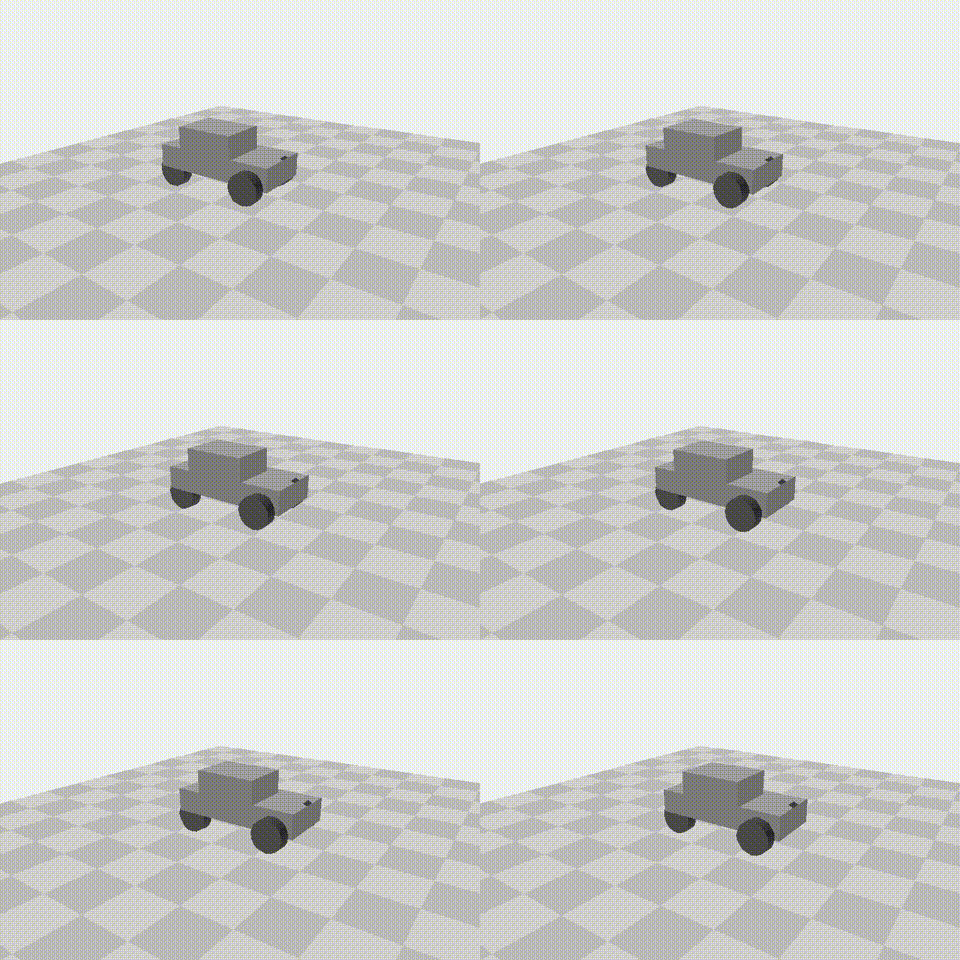
The layout approach is closer to rehearsing before shooting. The gray square car provides position, direction, and movement; The appearance image is responsible for color, materials, and lighting. Lightricks’ official plan also emphasizes the division of labor between these two inputs; the appearance image should be built from the first rehearsal frame to maintain compositional relationships. Check official instructions and workflow.
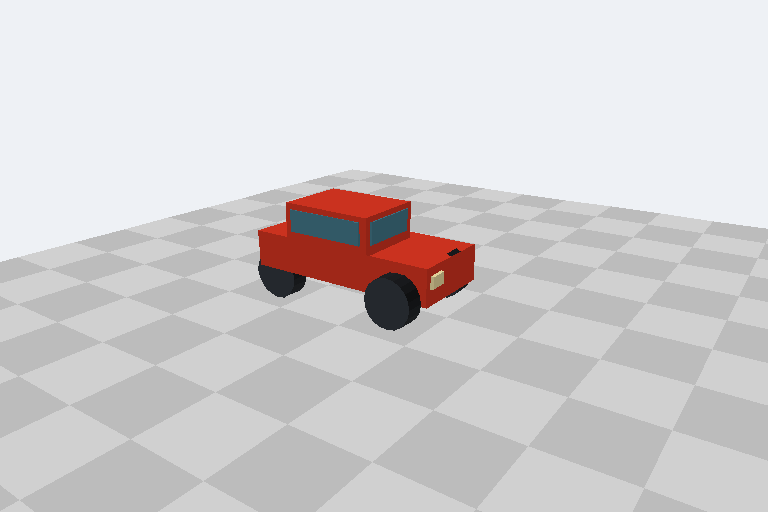
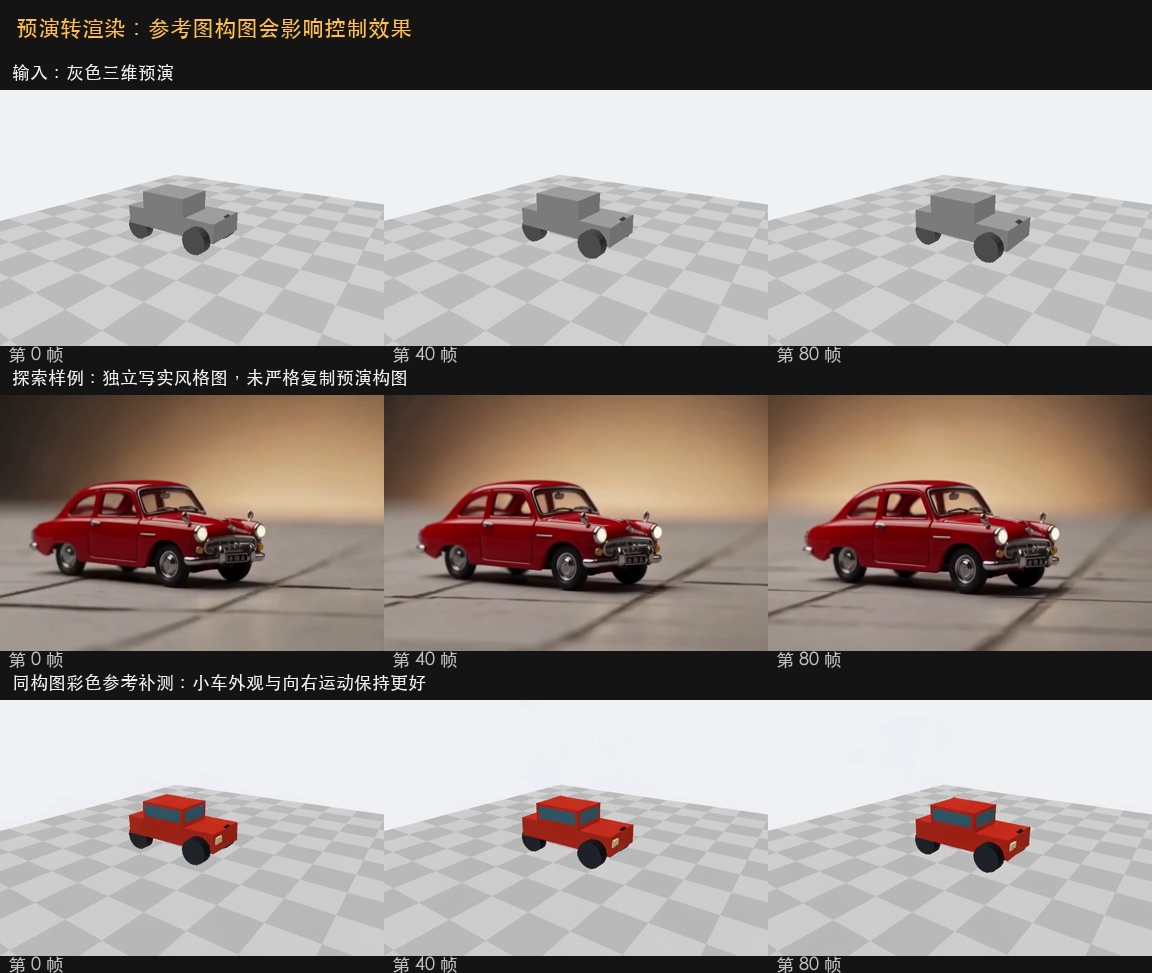
The first time, I used a realistic red car frame from another H3 video as the exterior image. The finished photo was indeed close to that realistic car, but the vehicle’s size, position, and camera relationship didn’t strictly follow the gray rehearsal. The second time, I switched to the same rehearsal color first frame and simultaneously revised the description. The red square car moved to the right with the drive, but the diagnostic frame showed no wheel detachment.
Both times were 768×512 frames, 81 frames, about 3.38 seconds, and took about 145 seconds. The make-up test adjusted the reference image and description inputs, so not all improvements were attributed to just one variable. This result clearly demonstrates the importance of properly preparing materials; complex figures, precise geometric errors, and high resolution have not yet been automatically passed.
Sound must also be truthful: although the composition supplement test includes audio tracks, the overall loudness is about −95.7 dBFS, close to mute. When creating audio clips, you need to actually play the original sound; you can’t just announce the sound effect as good just because you see an AAC stream. This issue will not add gain to the original footage; the issues will be kept together.
How to use it in LocalBrain: select the model, then select the available capability
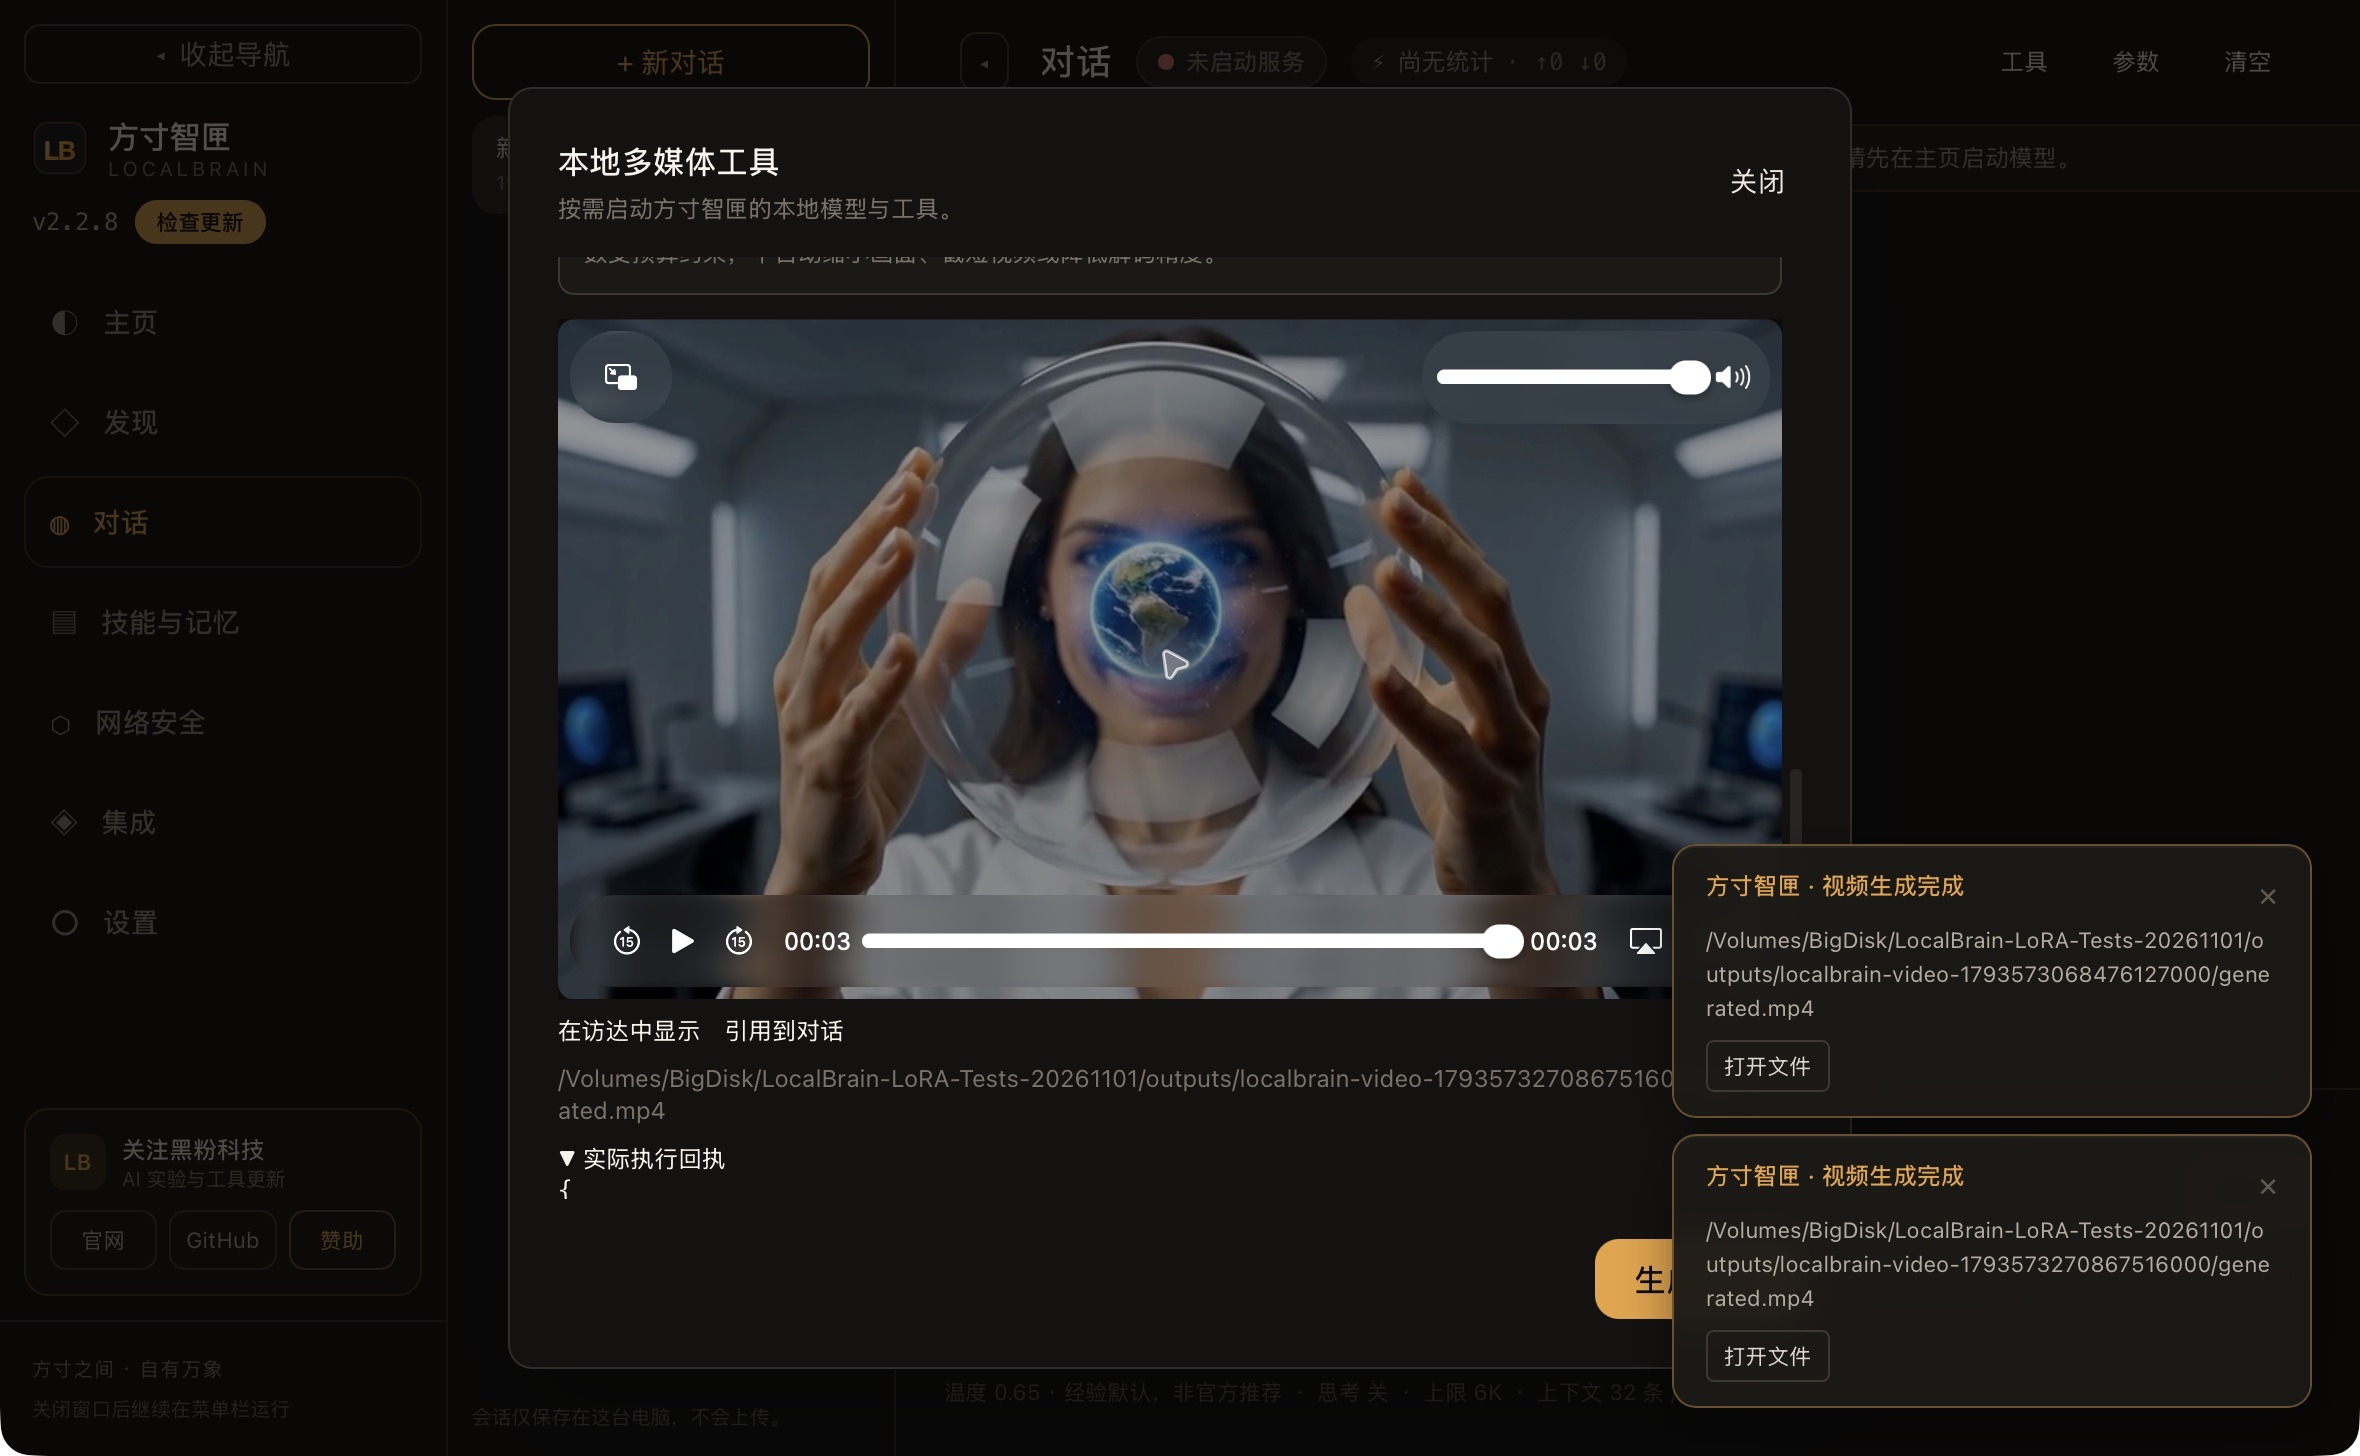
The software entry is unified into a single order: Discover page to prepare the model and optional capabilities; On the dialog page, open the local multimedia tools and enter video generation; First, select the model to be used this time, then choose the generation method, acceleration, and parameters. H3 Four-Step/Eight-Step is under H3 model, Transition/Layout is under LTX model. When turning off acceleration or switching back to normal generation, the existing model and files are retained.
- Select the model directory in “Discover”. Existing files can be reused in “Use existing files/select model directory”; New users should first check which basic weights, adapters, and environments are missing. Models and caches can be placed on external drives.
- Open the video tool in the dialogue and select the model first. H3 Choose Normal, Four-Step, or Eight-Step; LTX Select Normal Text, Opening and Ending Frames, or Preview to Clip by task.
- First, fill in the input, then decide on the format, frame number, and seed. Transition provides the first and last images; Layout provides isogram references and 24 frames per second preview matching the request, without directly inserting mismatched long videos.
- After submission, once the original task is completed, play the full audio and check the actual output size; Keep prompts, seeds, receipts, and logs for retry and comparison.
| Installed version 2.2.7 calls | True output | Time-consuming |
|---|---|---|
| H3 Four steps | 256×256/22 frames | 21.56 seconds |
| H3 Eight steps | 256×256/22 frames | 25.96 seconds |
| Transition | 384×256/25 frames | 27.61 seconds |
| Layout | 384×256/25 frames | 33.28 seconds |
The four-second one-second demo is used to confirm installation version calls and cannot be used to estimate the 5-second 720P speed.
These four capabilities are first selected item by item in the 2.2.7 installable version, with the receipt checked 4 out of 8 times for the true forward and transition 576 adapter layers, and the 480 adaptation layers for layout. Then, the 2.2.8 candidate version added the following resolution presets and instant checks, and used the previous six 3-second sample verification invocations. Please refer to the release page and local version for the current public and candidate packages; do not write the local candidate as ‘all users have received it.’
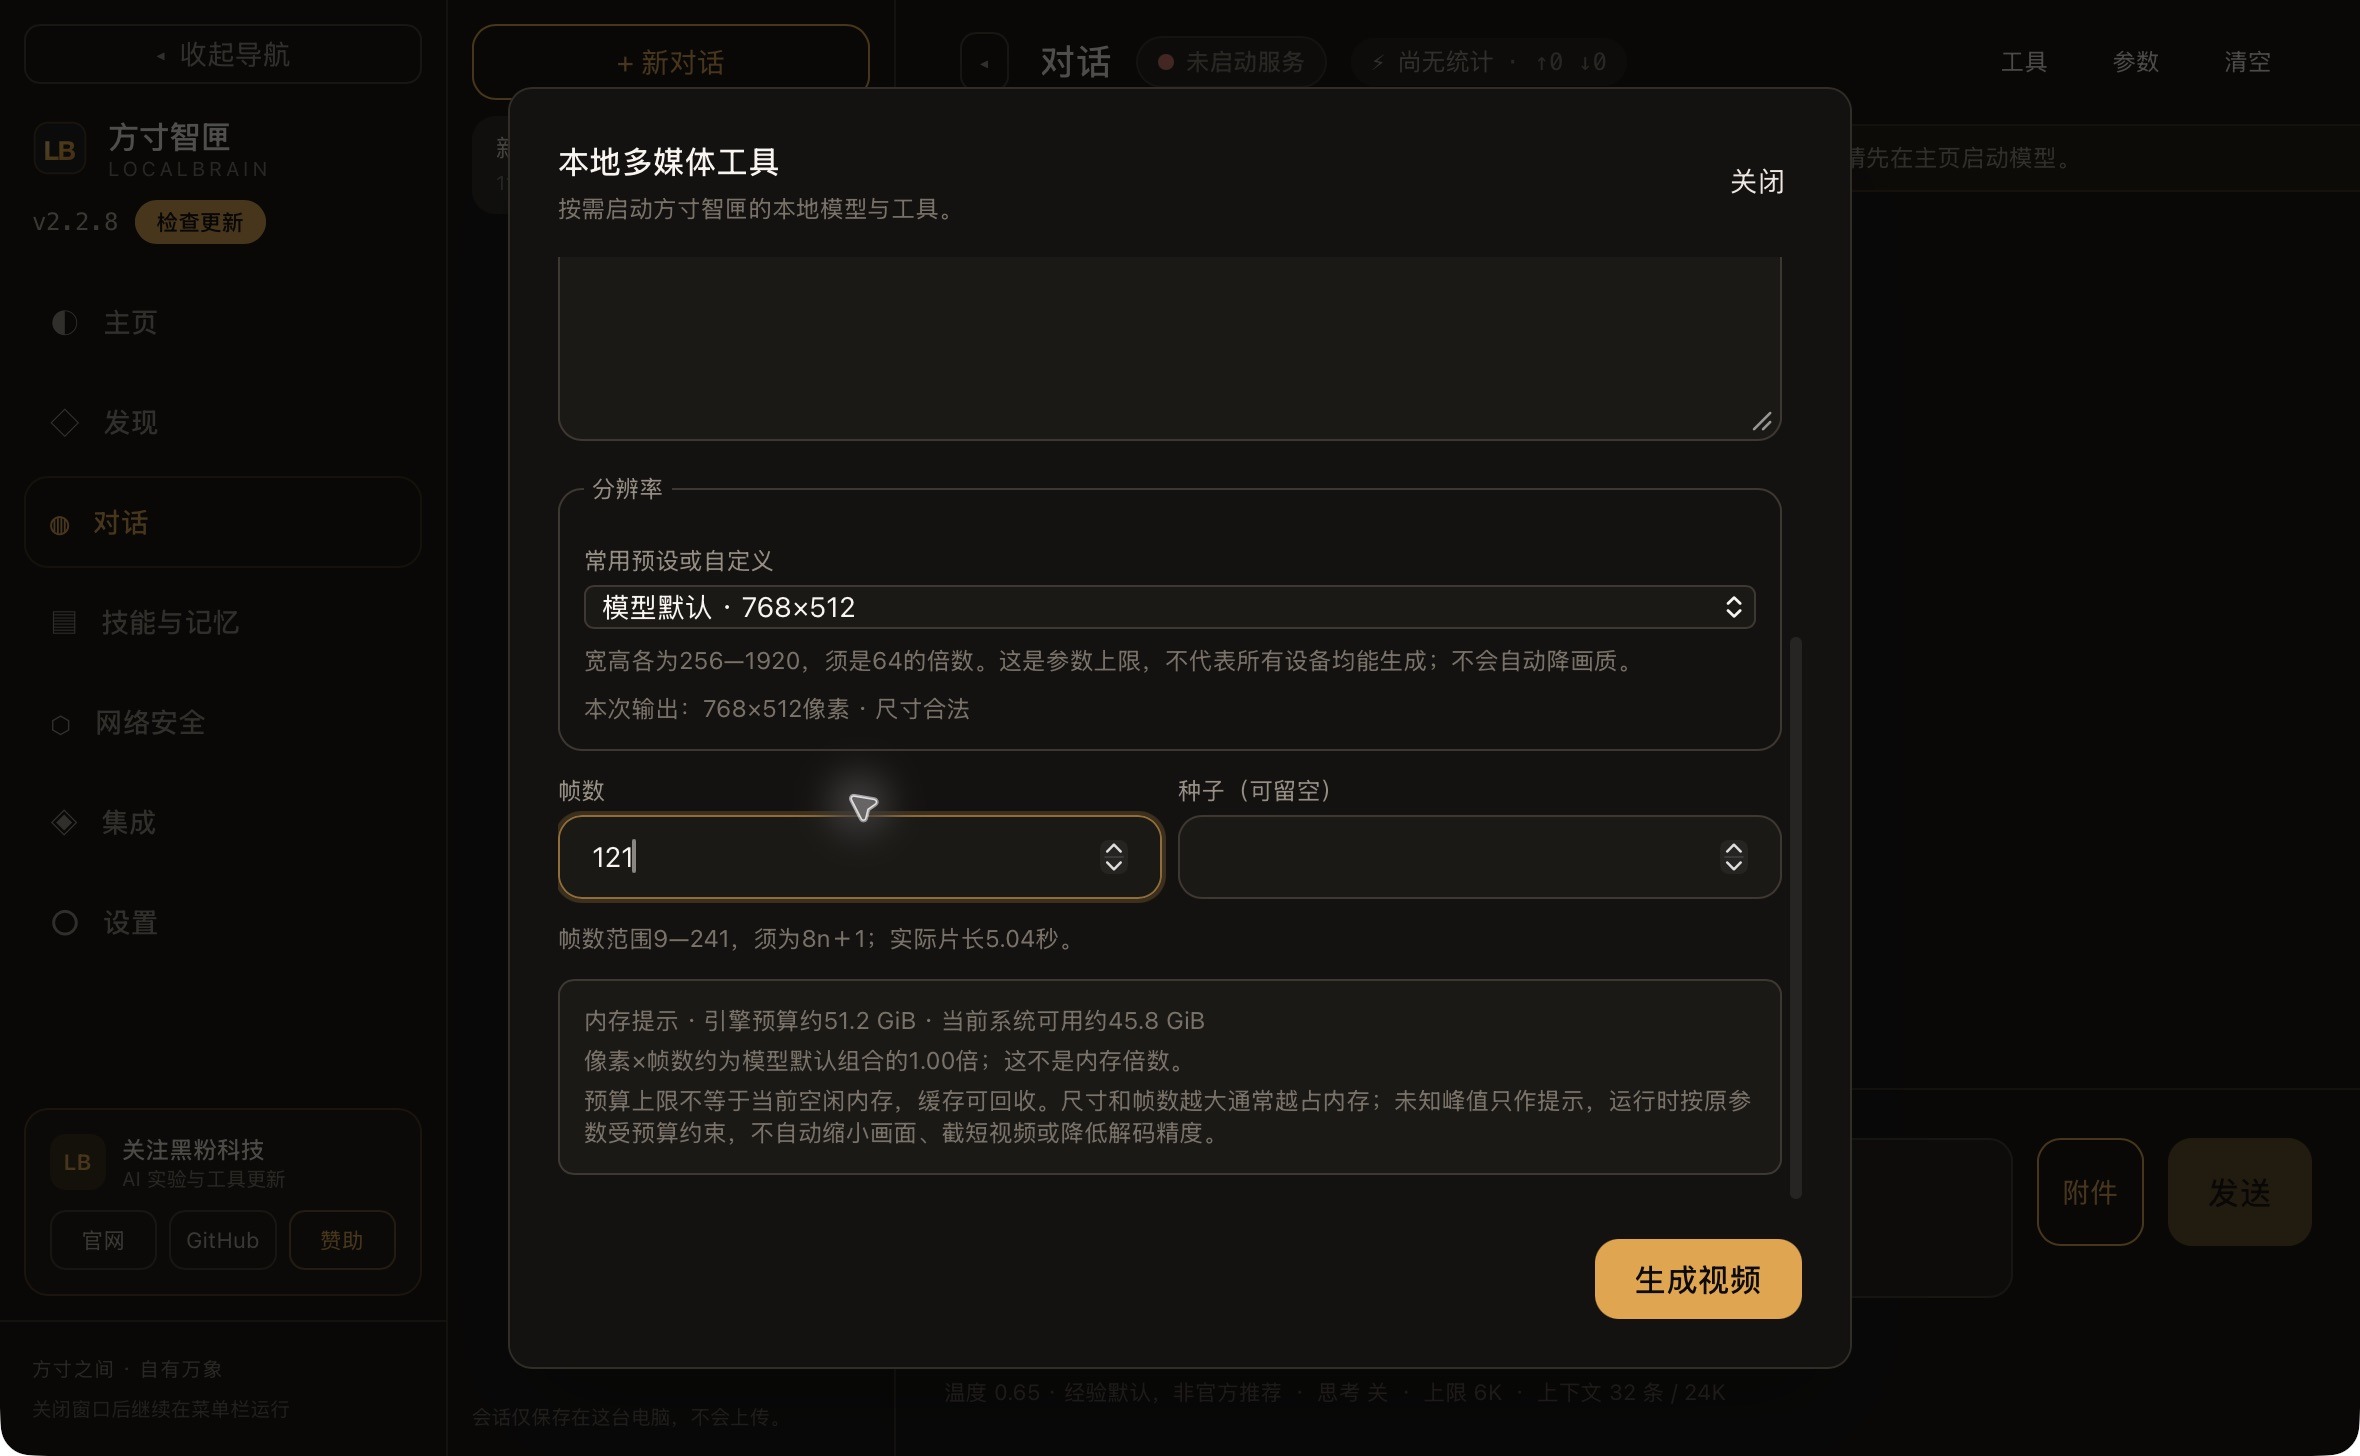
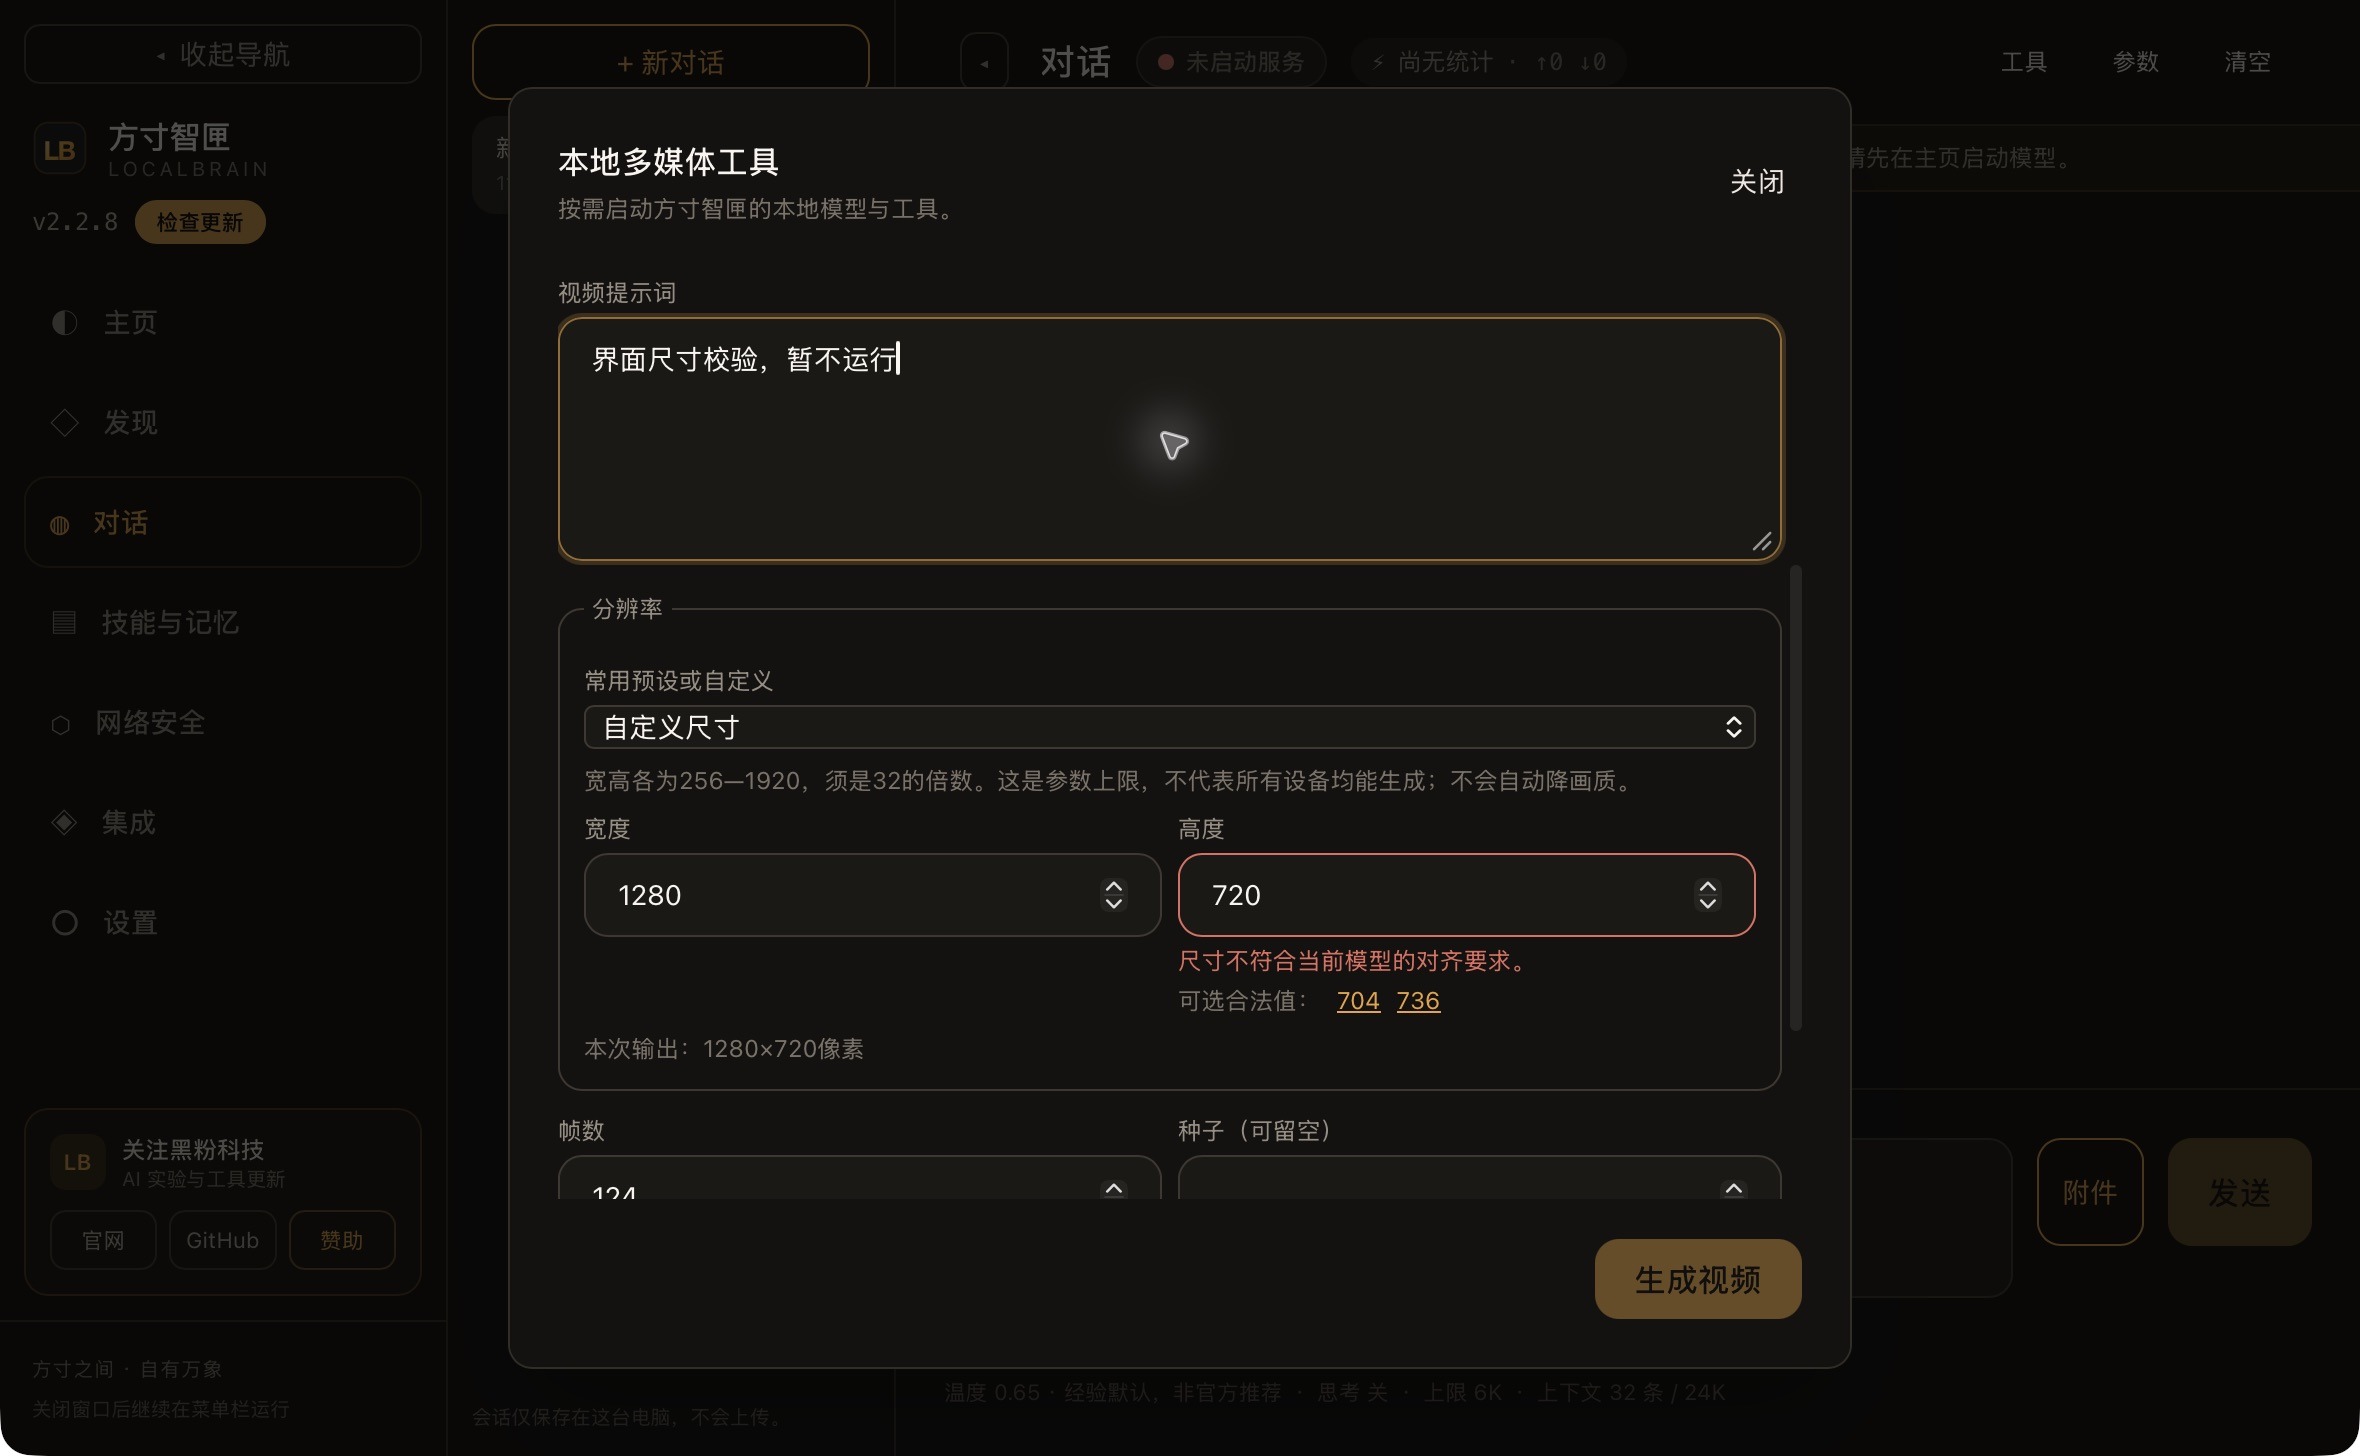
The native H3 formula requires width and height to be a multiple of 32, and an LTX multiple of 64. The 720 in a regular 1280×720 does not meet their alignment criteria, so the interface provides legal presets like “close to 720P,” rather than first receiving and waiting for the engine to give errors. 2.2.8 The single-sided parameter range for both candidates is 256–1920; this input limit only indicates the legal parameters allowed by the software and does not mean the 64GB Mac has run every possible combination within the range.
Frame rates also have tiered rates: H3 uses 17n+5, LTX uses 8n+1. At 24 frames per second, H3’s 124 frames per second are about 5.17 seconds, and LTX’s 121 frames are about 5.04 seconds. Increasing frame size and frame rate usually raises wait and memory pressure; the interface prompts the model with legal size, film length, and budget; When memory peak is unknown, it hints at risk; you cannot quietly reduce size, shorten clips, or change decoding accuracy.
Pika’s HD old films are kept, but don’t mix them up with this round
Previously, this Mac had already generated 1344×768 Pika original clips at 124 frames per second, about 5.17 seconds in six steps, with a complete 32-bit video decoding time of 1336.86 seconds, about 22 minutes 17 seconds. MLX activity peak was 29.55 GiB; At the end of the stage, the peak of the same time with activity and cache was about 39.82 GiB, which is a different caliber. The original track is very light, with an overall speed of about −53.07 dBFS, without volume enhancement.
This explains why memory estimates were revised back then, rather than being rejected outright at the sight of “720P.” However, this was a previous independent test, not the unified speed test for H3 and LTX this round. According to my cleanup requirements, Pika’s dedicated weights and environment were later removed, but the original video, sound, and acceptance records remained. Regeneration requires re-preparation; Playing and editing these existing materials does not require downloading models. Previous Pika real-world tests and official demos.
How will I use these abilities?
To create a few seconds of creative shot insertion, I first use the existing H3 four-step approach to test direction, then pick the relationship between hands, objects, and lenses frame by frame. When there are already open and ending shots, Transition is worth trying; The camera path must follow the design timeline, start with simple geometric rehearsals, then use Layout. Preparing materials is more important than writing prompts twice as long.
These Mac results for H3 and LTX rely on eight-bit conversions, dedicated pipelines, and current parameters. They can already deliver short shots ready for editing; feature consistency, complex dialogue, and top-spec content still need to be tested separately. I will present the mistakes visible in the original video along with the successful ones. That way, the next upgrade can be retested with the same input to see where the improvements actually happened.
Download and Update: LocalBrain is the installation package distribution page; model weights need to be prepared separately, and package size cannot be used as the full amount. Mac video results do not mean Windows or Linux have completed the same inference and acceptance. Downloading some models requires an international network, and Layout requires personal access to the official page; The software will not accept account information sharing terms on your behalf.
The GIF in the official account has no sound. To watch the full original audio, visit HyphenTech Blog and search for the corresponding article by title; The blog section provides a full video entry next to each dynamic sample.
Model Source and Reproduction Entry
Self-made software
Versions, changes and supported installers all come from the same public release records.
HyphenAssistant
Continue your computer’s DeepSeek Harness session from a phone browser. The service, computer and network must stay online; model costs follow your existing setup.
View public downloads and updates ↗LocalBrain
A local AI toolbox for transcription, speech, images, video, and MCP tools. Features vary by platform version.
View public downloads and updates ↗HyphenBox
A free model API radar and local router, with ongoing availability checks and keys kept on your device.
View public downloads and updates ↗ScreenLex
Turn subtitles from your own films and shows into an English vocabulary library, entirely offline.
View public downloads and updates ↗HyphenScreen
Screen recording and editing with a Resolve-style timeline, automatic redaction and pre-export checks.
View public downloads and updates ↗Support HyphenTech
Late nights and burned API credits went in,a cup of tea comes back out — only if you feel like it.
Save the QR codeScan with WeChatPress and hold to save the image, then open it from your album in WeChat Scan

WeChat tips · Any amount welcome






Comments
Loading comments…